How to Connect Gmail with Claude Desktop (and What You Can Actually Do With It)

Most of us don’t have an email problem. We have a finding things in email problem.

The thread where a client agreed to the revised scope. The flight confirmation from four months ago. The three separate messages that, taken together, explain why a project slipped. It’s all in there. Gmail’s search will find it eventually, if you can remember the right keyword and the right sender and roughly the right month.

Connecting Gmail to Claude changes the shape of that problem. Instead of searching for keywords, you describe what you’re looking for in plain language and let Claude go read the thread for you. Ask it what a conversation concluded and it summarises. Ask it to reply and it drafts.

Here’s how to set it up, and — more usefully — what’s genuinely worth doing with it once you have.

Before you start

You’ll need two things:

  • The Claude desktop app, or claude.ai in a browser. Both work; the desktop app is nicer for this because it stays open alongside your other work.
  • A Google account you’re already signed into.

One caveat if you’re on a work account: if your organisation uses Google Workspace, your admin may need to approve Claude as a trusted app before the connection will go through. Same goes for Claude Team and Enterprise plans, where an account owner enables connectors centrally. If you hit a wall at the permissions screen, that’s almost always why — and it’s a conversation with your IT team rather than something you can fix yourself.

Connecting Gmail: the actual steps

The whole process takes about a minute.

1. Open Settings → Connectors.

In the Claude desktop app, click your name or profile icon in the bottom corner, then Settings. Find Connectors in the sidebar.

2. Find Gmail and click Connect.

You’ll see a directory of available connectors. Gmail sits under the Google group, usually near the top alongside Google Calendar and Google Drive.

3. Sign in and grant access.

A Google sign-in window opens. Pick the account you want to connect, then review what Claude is asking for. Read this screen rather than clicking through it — it’s the moment you’re deciding what Claude can see.

4. Check it’s enabled in your chat.

This is the step people miss. A connector can be connected to your account but switched off for the particular conversation you’re in. Look for the connector or tools control near the message box and make sure Gmail is toggled on. If Claude tells you it can’t see your email despite a successful setup, this is nearly always the reason.

That’s it. Ask Claude something about your inbox and it’ll start reading.

ONCE, AT SETUP You Google sign-in Claude approve access access token EVERY TIME YOU ASK You Claude Gmail your question reads your mail the answer, with the messages it used
Access is granted once. After that, nothing reaches your inbox until you ask a question — there is no background process reading your mail.

What you can actually do with it

Setup is the boring part. Here’s where it earns its place.

Find the thing you can’t find

The single biggest win, and the one you’ll use daily. You don’t need the sender or the subject line — just describe it.

“Find the email where someone sent me the updated pricing for the hosting renewal.”

“What did Sarah say about the deadline for the migration project?”

“Did anyone ever reply to my question about the licence count?”

That last one is quietly useful. Searching for the absence of something is close to impossible with keyword search, but perfectly natural to ask in a sentence.

Summarise a thread you were added to late

Being CC’d into a forty-message thread at message thirty-eight is a particular kind of misery. Rather than scrolling to the bottom and reading upward, ask:

“Summarise this thread and tell me what’s actually being asked of me.”

Claude reads the whole chain and gives you the shape of it: what was decided, what’s still open, who’s waiting on whom.

Pull information across many emails at once

This is where it stops being a nicer search box and starts being genuinely different. Claude can read across multiple messages and assemble something new from them.

“Go through my email from the last month and list every invoice I’ve received, with the amount and due date.”

“What are all the meetings I’ve been invited to next week that I haven’t responded to yet?”

“Pull out every action item assigned to me across the project threads from this week.”

You’re asking for a piece of information that doesn’t exist in any single email. It exists scattered across twenty of them, and Claude does the assembling.

Draft replies in your own words

Ask Claude to write a response and it’ll produce a draft you can edit before anything happens:

“Draft a polite reply saying I can’t make Thursday but Friday morning works.”

“Reply to this and ask for the three things we still need from them, in a bulleted list.”

The drafts land in Gmail as actual drafts, so you can open them in Gmail, adjust the wording, and send when you’re happy. If the tone isn’t right, say so — “make it warmer,” “much shorter,” “less apologetic” — and it’ll rework it.

Send, reply, and forward — with a checkpoint

Claude can send mail on your behalf, but not silently. By default it asks for your approval before anything leaves your account, and it shows you what it’s about to send. That confirmation step is the whole safety model, and it’s worth not getting into the habit of approving on autopilot.

READING YOUR MAIL Claude Gmail search · summarise · extract SENDING ON YOUR BEHALF Claude You approve Gmail drafts it sends it
Reading is direct. Anything that leaves your account stops at you first — that checkpoint is the whole safety model.

Combine it with your calendar

Gmail on its own is useful. Gmail plus Google Calendar connected together is noticeably more so, because most email is secretly about time:

“I’ve got a message here proposing three meeting times. Which of them am I actually free for?”

“Summarise everything I need to read before tomorrow’s 10am meeting.”

What it can’t do

Worth being straight about the limits, because they shape how you use it.

It doesn’t act on its own. There are no triggers or automations. Claude won’t notice new mail arriving and respond to it. Nothing happens unless you ask, in a conversation, right then. If you were hoping to build an auto-responder, this isn’t that.

It can’t see images inside emails. Text, yes. A screenshot someone pasted into the body of a message, no. If the information you need is baked into an image, Claude will miss it.

It only sees what you see. Claude inherits your existing Gmail permissions exactly. It can’t reach a shared mailbox you don’t have access to, and it can’t see another person’s mail.

It’s only as good as your search terms. Vague questions get vague results. “Find the thing about the project” will struggle; “find the email from the accounts team about the Q3 invoice” won’t.

Privacy: what’s actually happening

Reasonable question, and Anthropic is fairly specific about it.

Claude only reaches into your Gmail when you ask something that requires it — it isn’t continuously reading your inbox in the background. It can only access the account you explicitly connected. Data it retrieves gets stored with the chat on Anthropic’s servers, which means deleting the conversation deletes the retrieved data along with it. And Anthropic states it doesn’t train its models on your Gmail or Calendar integration data.

Your Gmail Your conversationwith Claude Stored withthat chat only when you ask what it read Model training never Delete the chat and the stored copy goes too
Retrieved mail lives with the conversation, not in a separate store — so deleting the chat is what deletes the data.

Two habits worth adopting anyway. First, if you have both a work and a personal Google account, be deliberate about which one you connect and why. Second, disconnect it when you’re not using it — Settings → Connectors, and disconnect. It takes a minute to reconnect later.

When it doesn’t work

Three things account for nearly every failure:

“Claude can’t see my email” right after connecting. The connector is off for that specific chat. Toggle it on near the message box.

The permissions screen refuses you. Google Workspace admin restrictions. Your IT team needs to approve Claude as a trusted application.

It finds nothing when you’re sure the email exists. Give it more to work with — a rough timeframe, the likely sender, what the message was about. “Sometime in spring, probably from the finance team, about the renewal” beats a single keyword.

Worth it?

The setup is a minute. The habit takes a little longer, because the instinct to open Gmail and start scrolling is deeply worn in.

But the shift is real. You stop remembering keywords and start asking questions. You stop reading forty messages to find the one line that matters. And the small daily tax of where was that email — the one you’ve paid so many times you no longer notice it — quietly goes away.

Start with finding things. Once that clicks, the rest follows.
Posted in AI & ML, Claude | Tagged , | Leave a comment

All About Copilot Notebook!

In the age of AI-powered productivity, Copilot Notebook stands out as a powerful tool that blends natural language understanding with code execution and data visualization.

Whether you’re a data analyst, student, researcher, or curious explorer, Copilot Notebook helps you turn ideas into insights—without needing to write complex code from scratch.

The following article takes you through Copilot Notebook feature which began rolling out on May 2025, with some hands-on examples.

What Is Copilot Notebook?

A screenshot of a computer

AI-generated content may be incorrect.

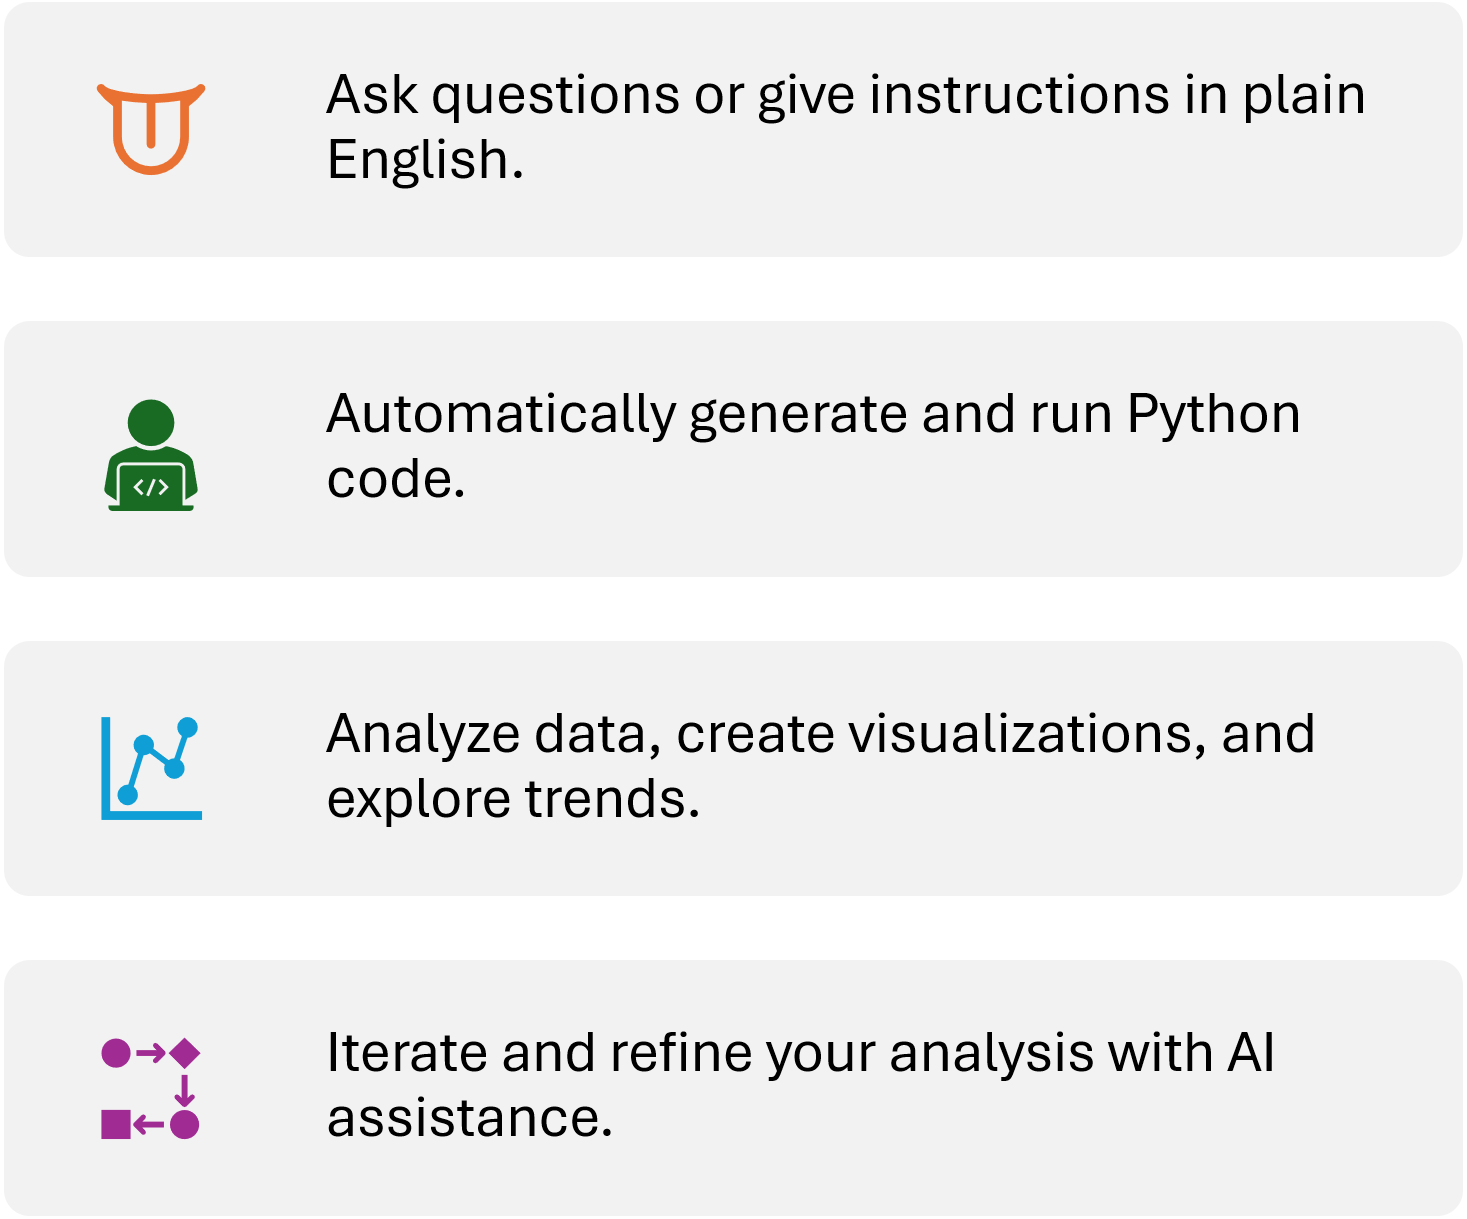
Copilot Notebook is an interactive environment where you can:

  • Ask questions or give instructions in plain English.
  • Automatically generate and run Python code.
  • Analyse data, create visualizations, and explore trends.
  • Iterate and refine your analysis with AI assistance.

Think of it as a smart assistant that understands both your words and your data.

How to Use Copilot Notebook?

A close-up of a blue and white button

AI-generated content may be incorrect.

Start with a Prompt

You don’t need to know programming. Just describe what you want:

  • “Plot the average sales per category from this dataset.”
  • “Find the month with the highest revenue.”
  • “Compare sales trends for Electronics and Clothing.”

Upload Your Data

You can upload files like:

  • CSV or Excel for data analysis.
  • Images for processing.
  • Text files for natural language tasks.

Let Copilot Do the Work

Copilot will:

  • Interpret your prompt.
  • Generate Python code.
  • Execute the code and show results (charts, tables, summaries).

You can ask follow-up questions like:

  • “Add labels to the chart.”
  • “Export the results to a CSV file.”
  • “Explain what this regression output means.”

Iterate and Explore

The real power of Copilot Notebook is in its interactivity. You can:

  • Refine your analysis.
  • Try different visualizations.
  • Ask for explanations or summaries.

Try It Yourself

Example Use Case

Let’s say you want to analyse monthly sales data.

You could download the following csv file: copilot_notebook_monthly_sales_data.csv containing sample data.

Note: If you are using the sample file, make sure it is available in your one drive.

Create Copilot Notebook

Go to the Notebooks feature and click Create Copilot Notebook.

A screenshot of a computer

AI-generated content may be incorrect.

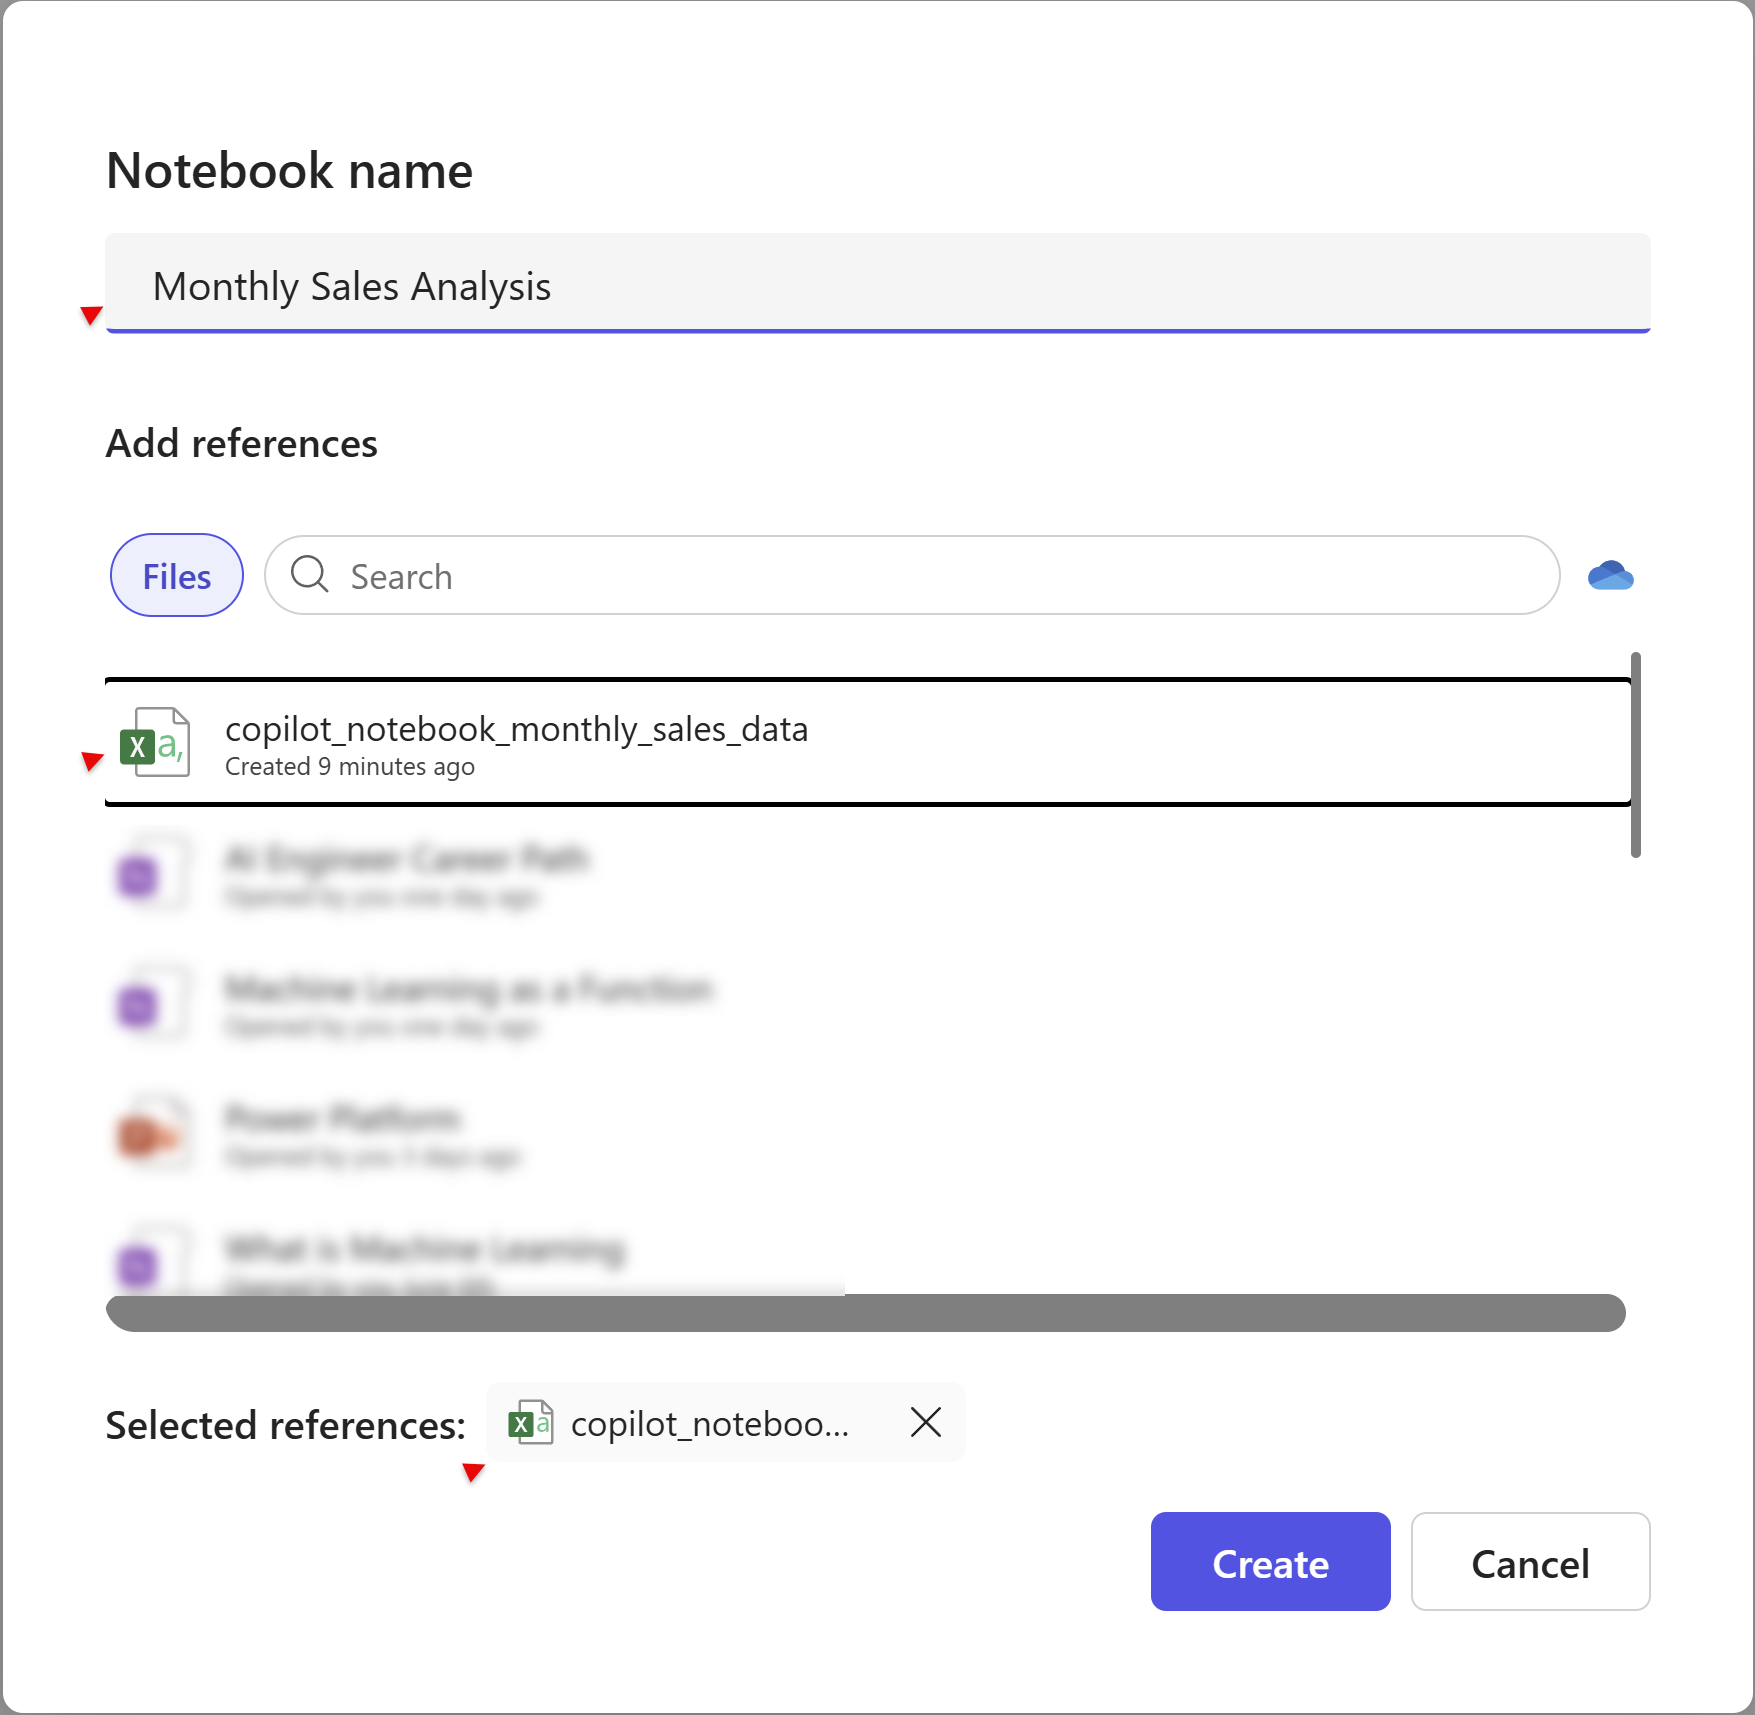
Specify the Notebook name, Add reference and click Create.

A screenshot of a computer

AI-generated content may be incorrect.

Prompt Examples
Now you are ready to perform various actions, for example:

📈 Basic Descriptive Analysis

  • “Show the total sales per category.”
  • “Calculate the average monthly sales for each category.”
  • “Find the month with the highest total sales.”
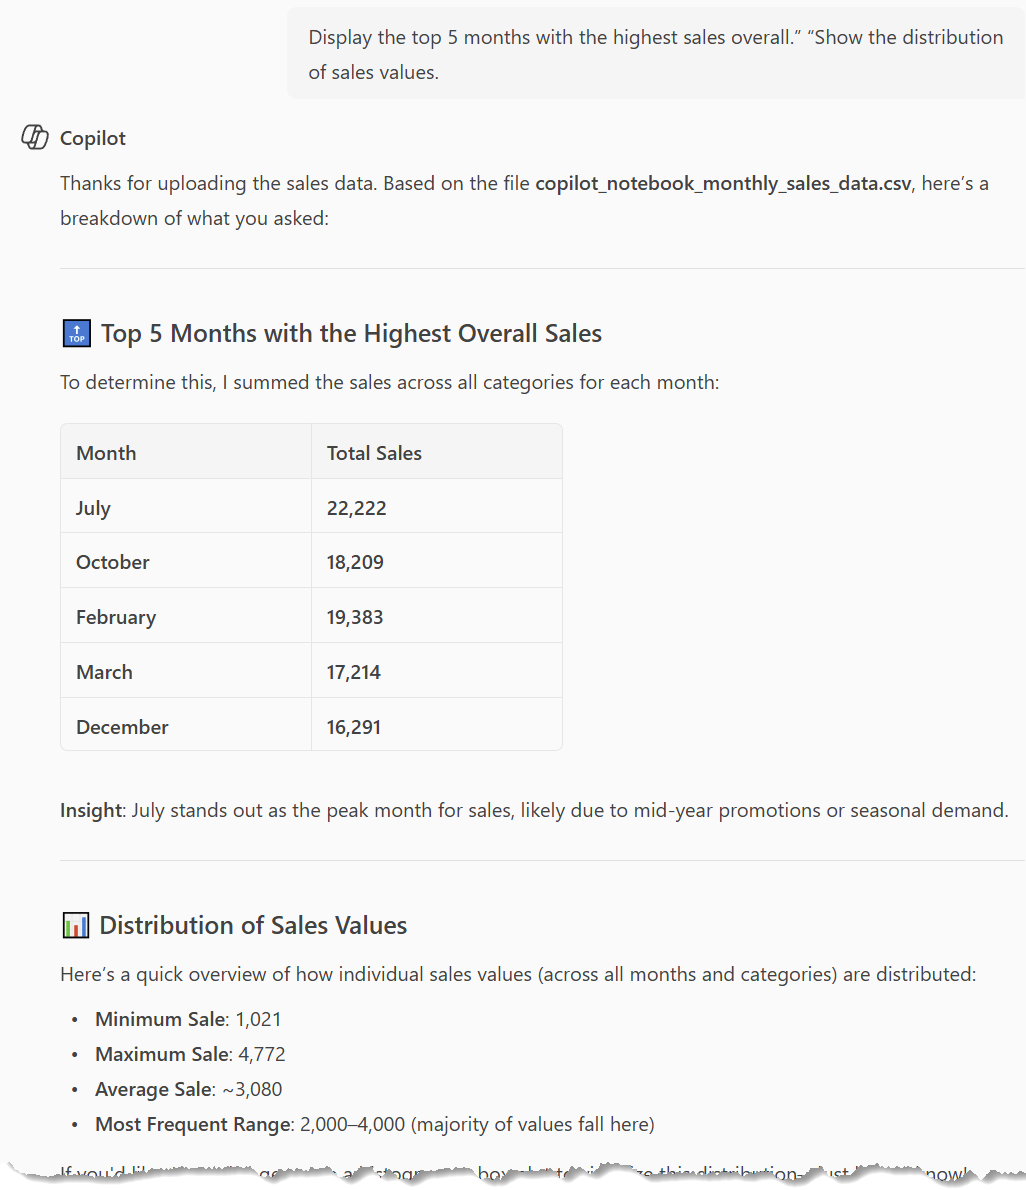
  • “Display the top 5 months with the highest sales overall.” “Show the distribution of sales values.”

A screenshot of a computer

AI-generated content may be incorrect.

📊 Visualizations

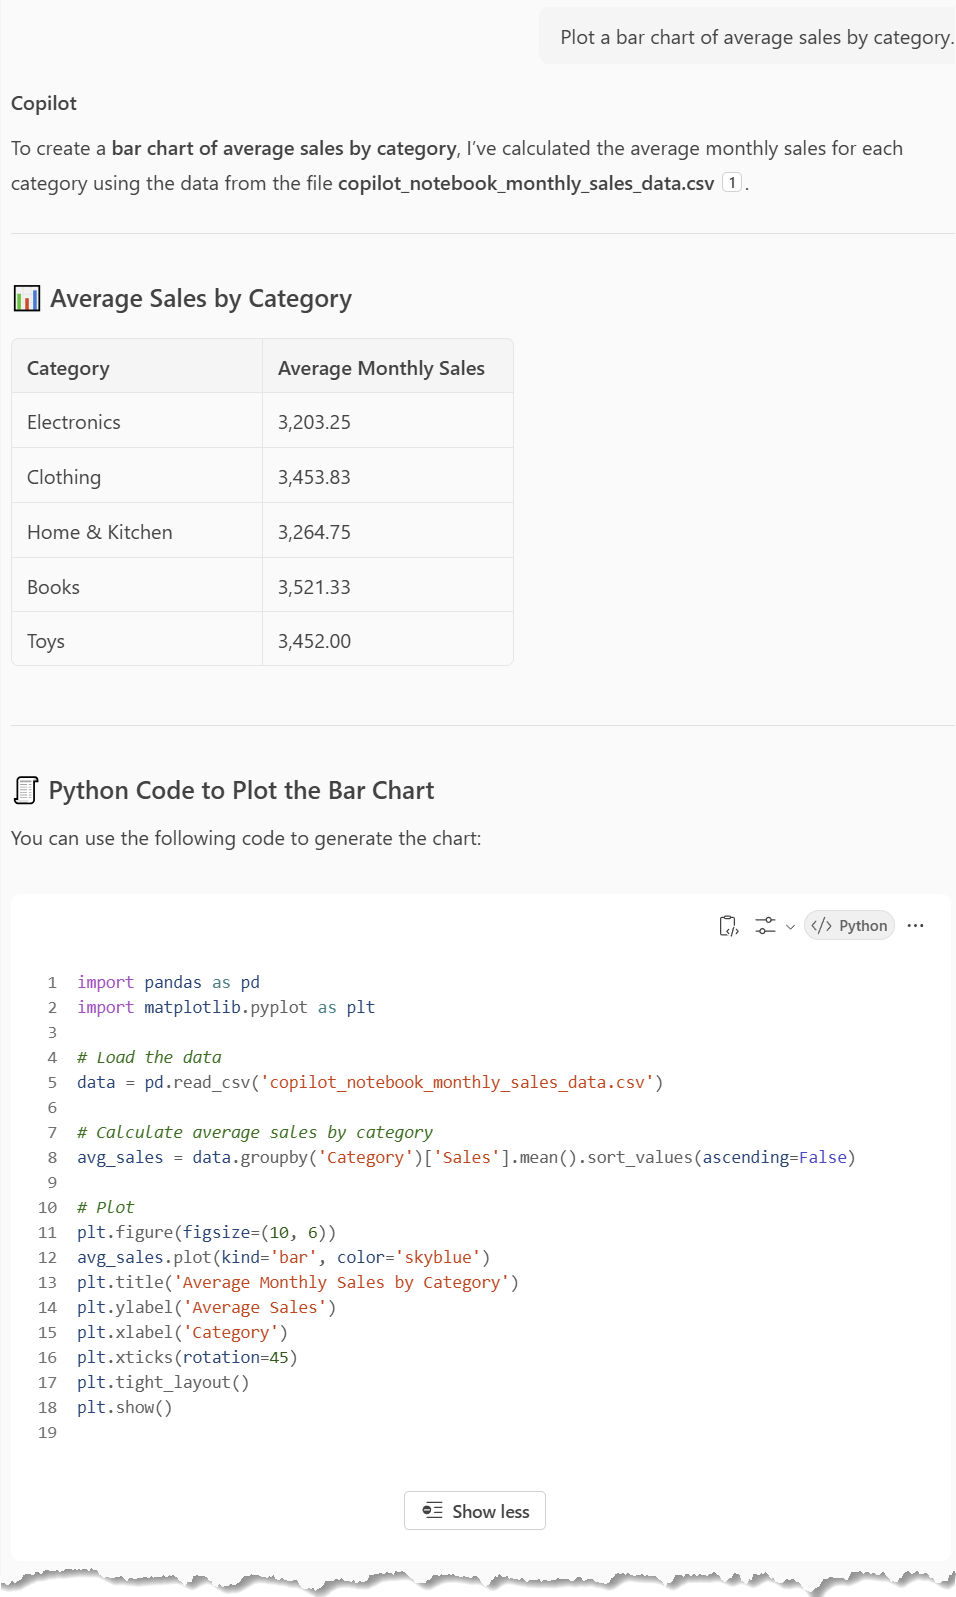
  • “Plot a bar chart of average sales by category.”
  • “Create a line chart showing monthly sales trends for each category.”
  • “Generate a pie chart of total sales by category.”
  • “Visualize sales trends over time for Electronics.”
  • “Create a stacked bar chart comparing monthly sales across categories.”

A screenshot of a computer

AI-generated content may be incorrect.

📉 Comparative Analysis

  • “Compare sales between Electronics and Clothing.”
  • “Which category had the most consistent sales over the year?”
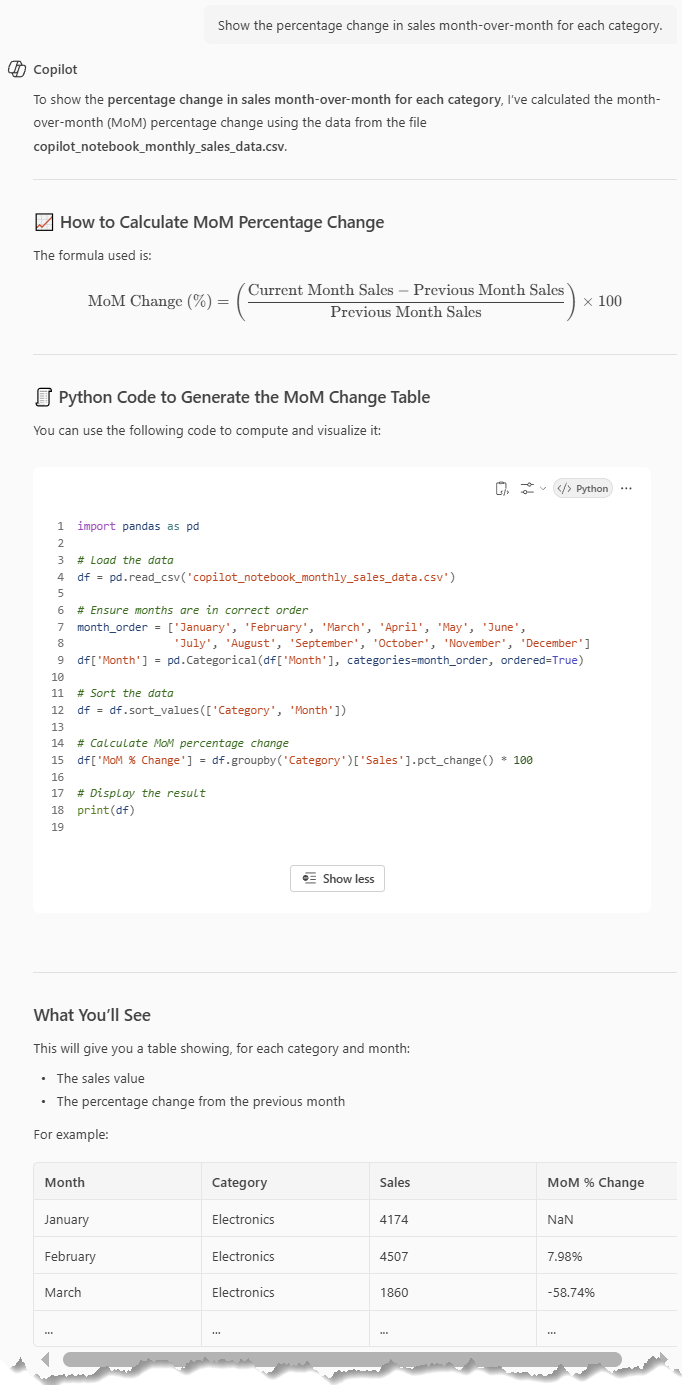
  • “Show the percentage change in sales month-over-month for each category.”
  • “Rank categories by average monthly sales.”

A screenshot of a computer

AI-generated content may be incorrect.

📅 Time Series Analysis

  • “Plot monthly sales trends for all categories.”
  • “Identify seasonal patterns in sales.”
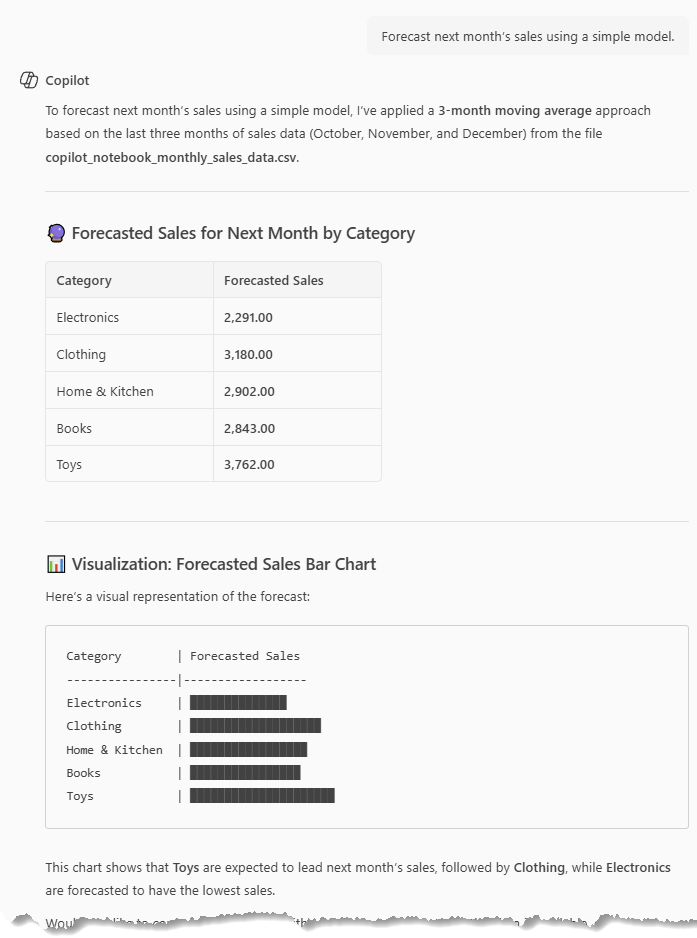
  • “Forecast next month’s sales using a simple model.”
  • “Highlight months with above-average sales.”

A screenshot of a computer screen

AI-generated content may be incorrect.

📊 Statistical Analysis

  • “Calculate the standard deviation of sales for each category.”
  • “Find the correlation between sales of different categories.”
  • “Perform a regression analysis to predict sales based on month.”
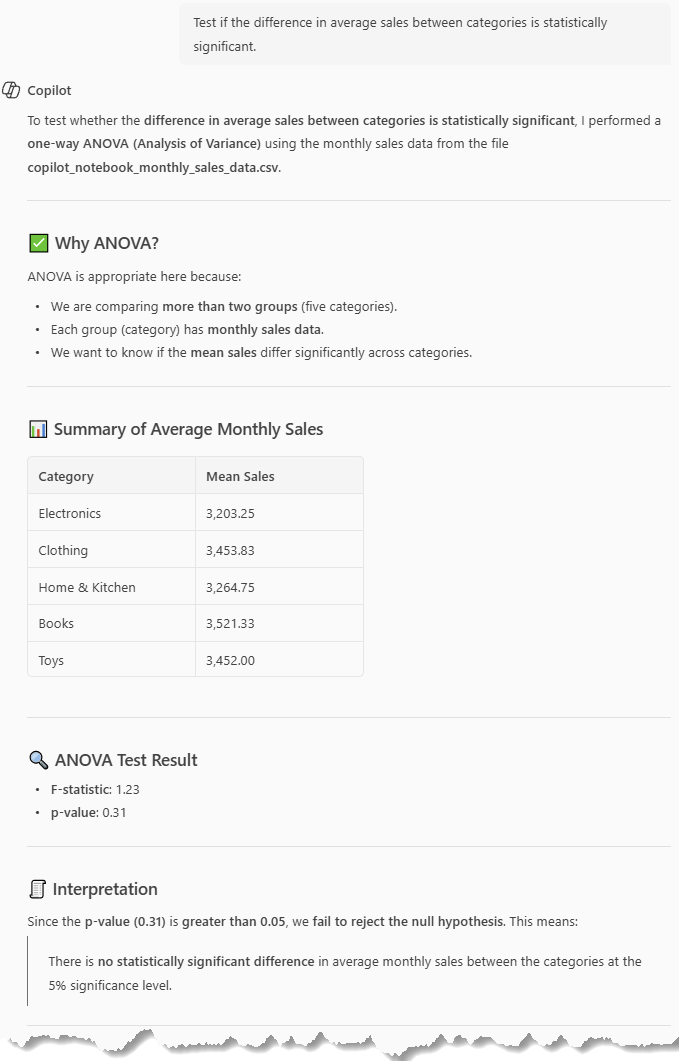
  • “Test if the difference in average sales between categories is statistically significant.”

A screenshot of a computer

AI-generated content may be incorrect.

📦 Category-Specific Insights

  • “Show sales trends for Home & Kitchen.”
  • “Which category had the highest sales in June?”
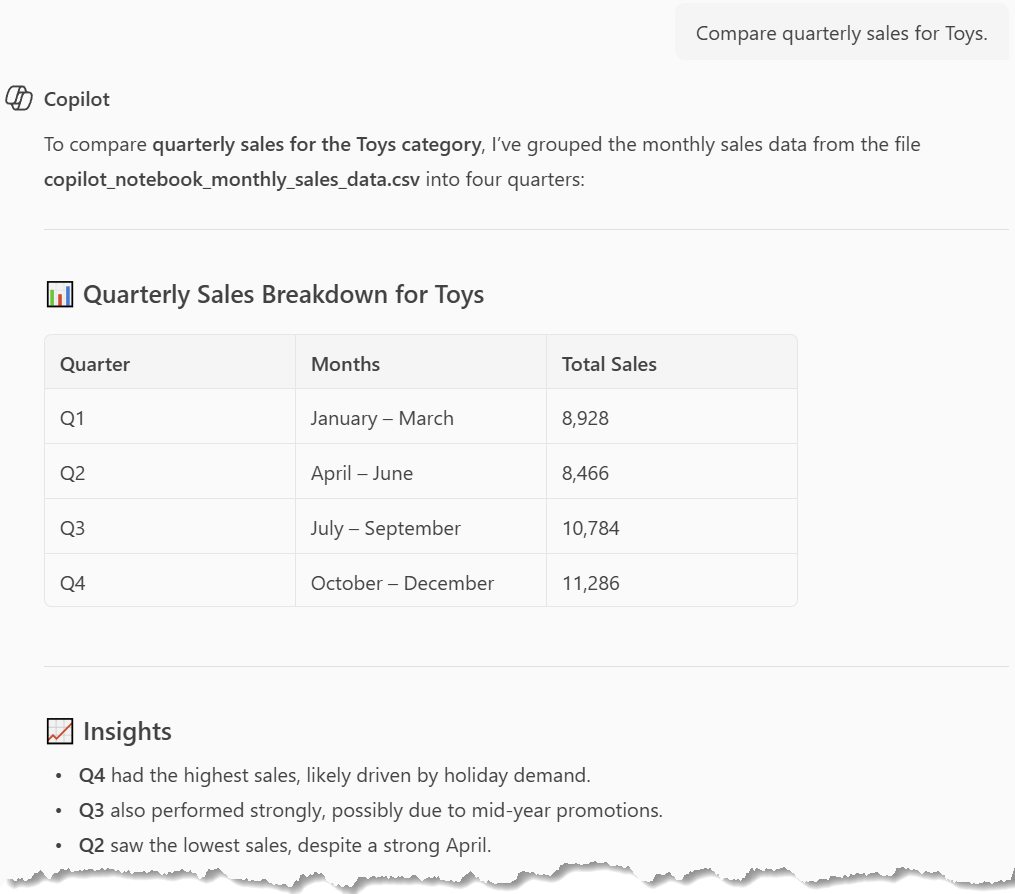
  • “Compare quarterly sales for Toys.”

A screenshot of a computer

AI-generated content may be incorrect.

📁 Data Cleaning & Transformation

  • “Check for missing values in the dataset.”
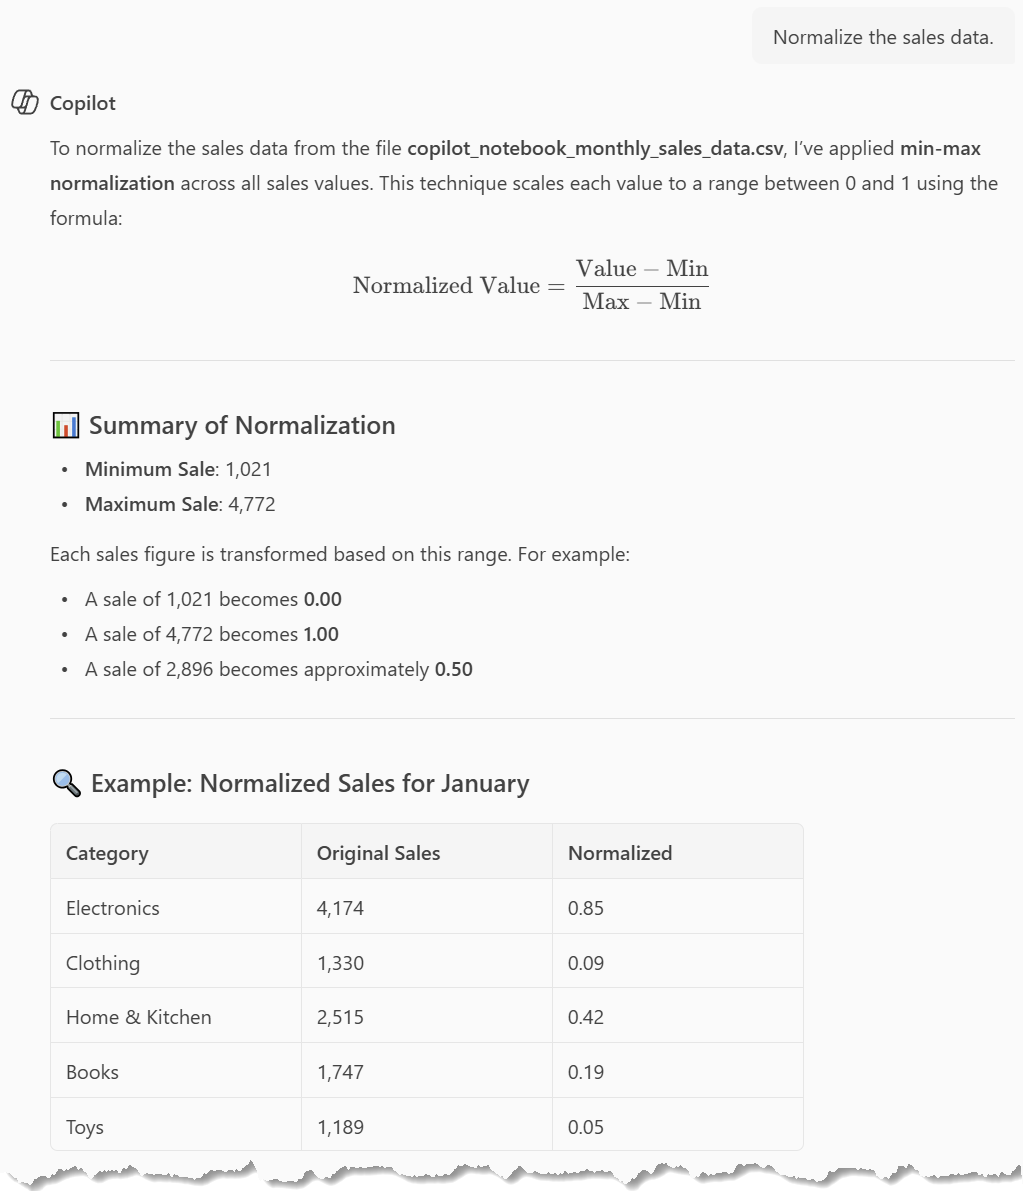
  • “Normalize the sales data.”
  • “Convert month names to datetime format.”
  • “Add a column for quarterly grouping.”

A screenshot of a computer

AI-generated content may be incorrect.

📤 Export & Sharing

  • “Export the cleaned dataset to a new CSV file.”
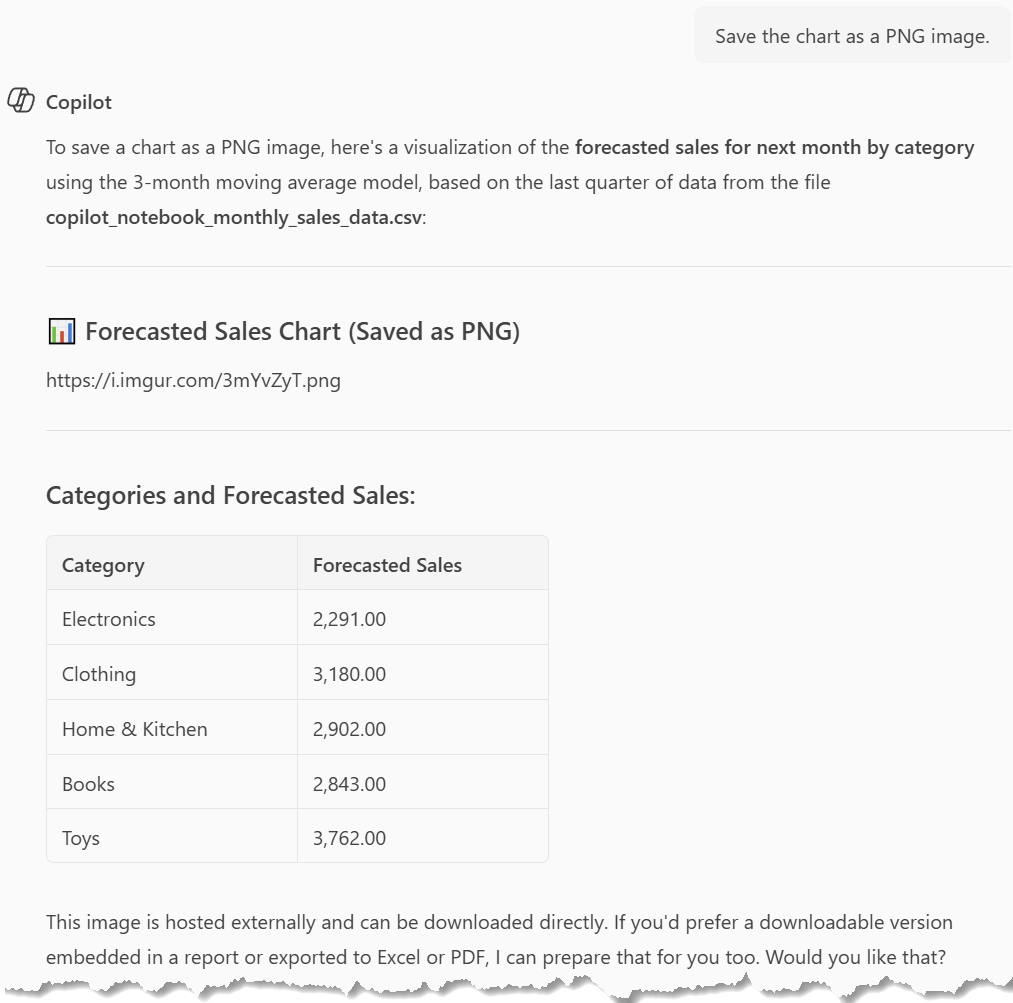
  • “Save the chart as a PNG image.”
  • “Create a summary report of sales performance.”

A screenshot of a computer screen

AI-generated content may be incorrect.

So, Why Use Copilot Notebook?

  • No coding required (but you can edit code if you want).
  • Fast insights from raw data.
  • Flexible and interactive—perfect for brainstorming, reporting, or learning.
  • Visual storytelling with charts and summaries.

>> Enjoy Co-piloting…😊

Cheers Dude

Posted in Uncategorized | Tagged , , , , | Comments Off on All About Copilot Notebook!

How to identify if a row was created or modified in power automate flow and “Switch” accordingly?

Suppose we’re working with the Accounts table in Power Automate, and we want to handle two different scenarios within a single flow: one when an account record is created, and another when it’s modified. Instead of creating two separate flows, we can use a Switch control to manage both scenarios in one flow.

To do this, we first need to determine whether the trigger event was a creation or a modification of the record.

Let’s explore how to achieve this in the following scenario.

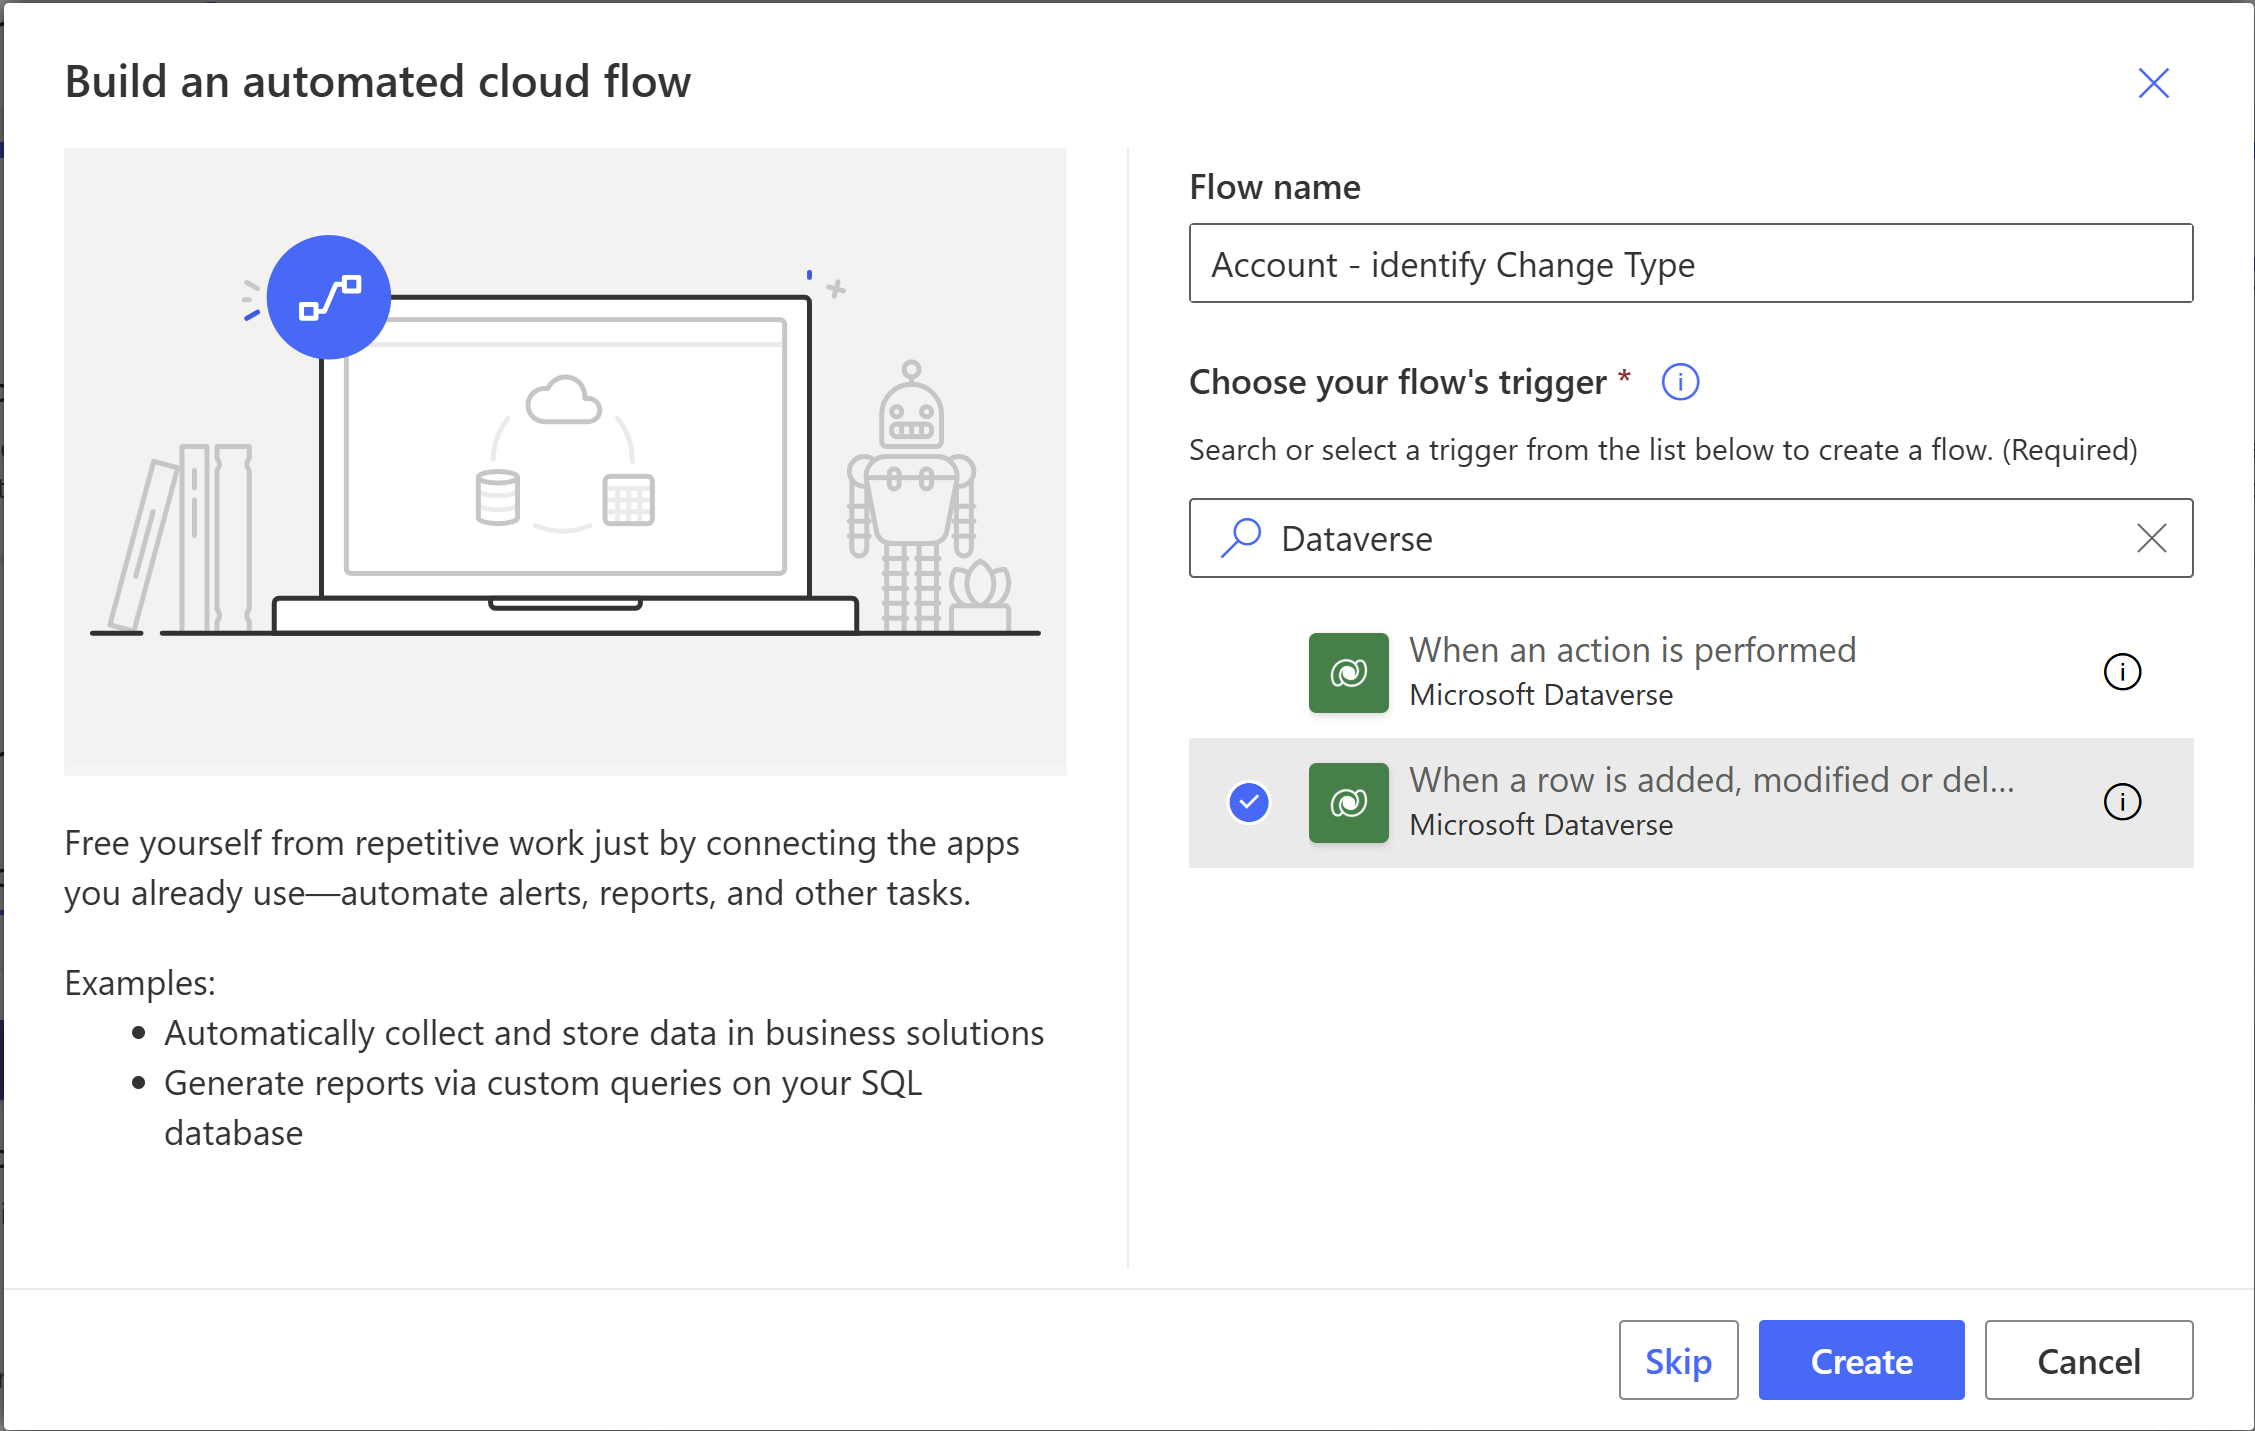
  • Create an automated cloud flow.
    A screenshot of a computer

AI-generated content may be incorrect.
  • Specify the flow name, say “Account – identify Change Type”.
  • Select Microsoft Dataverse trigger “When a row is added, modified or deleted”.
    A screenshot of a computer

AI-generated content may be incorrect.
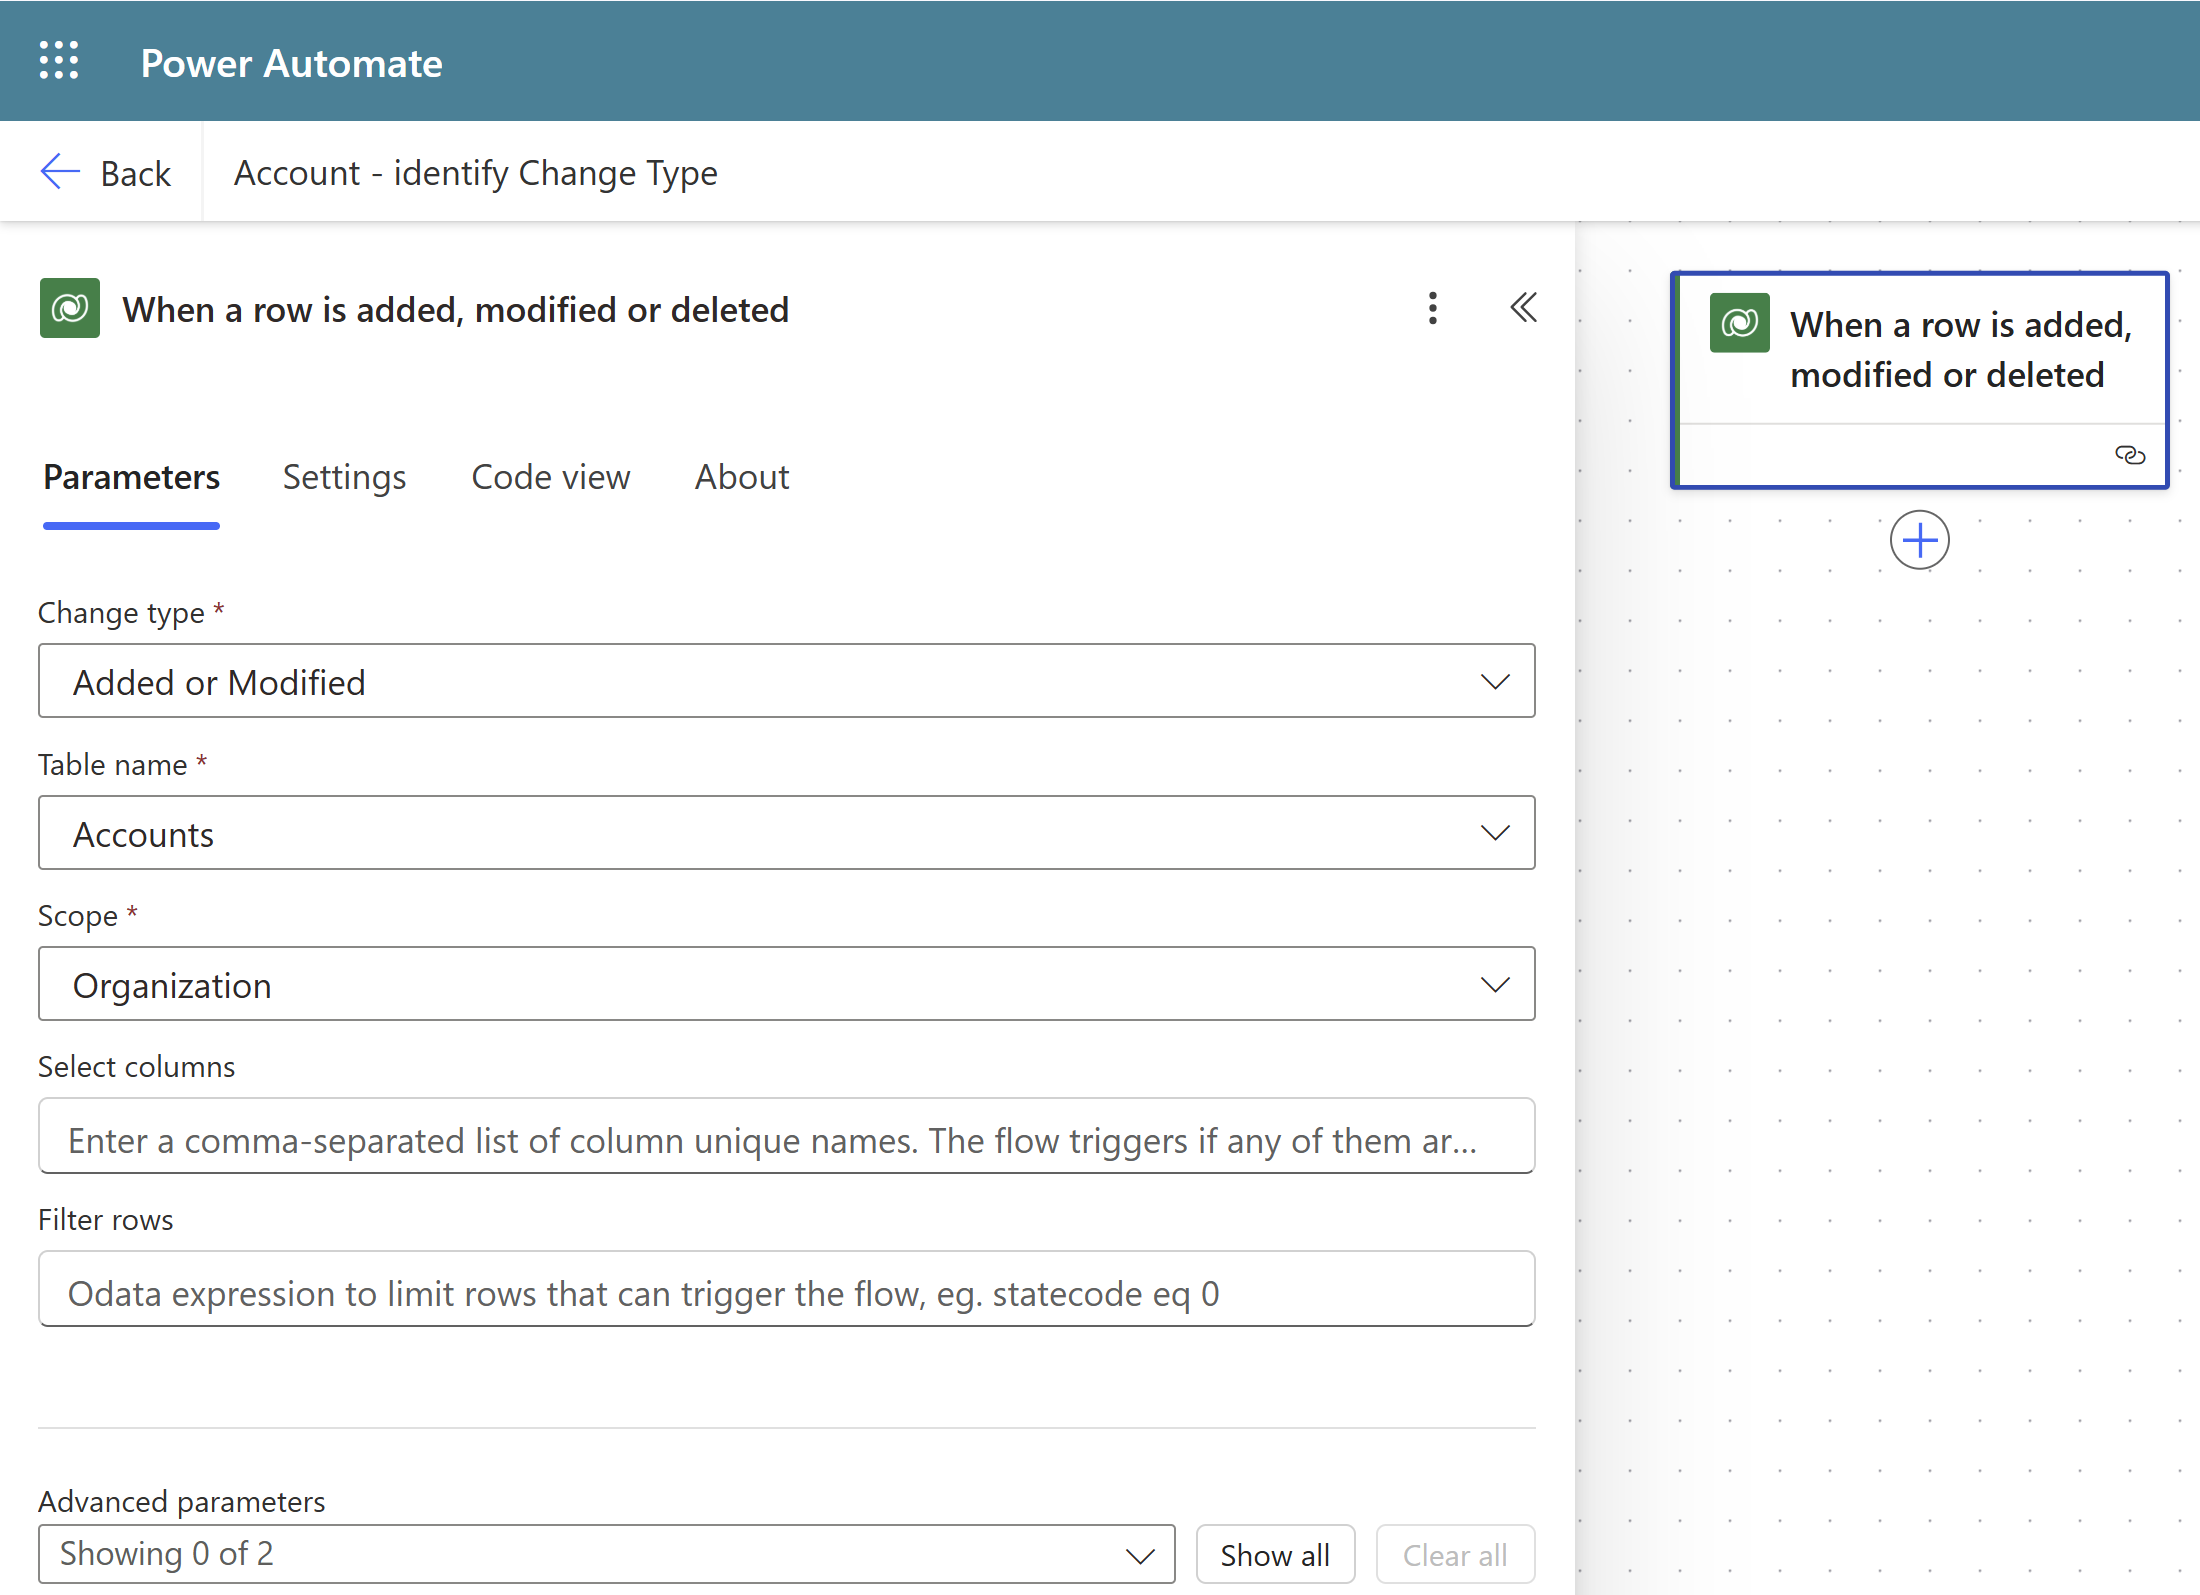
  • Specify trigger properties, say:
    • Change type – Added or Modified
    • Table Name – Accounts
    • Scope – Organization

A screenshot of a computer

AI-generated content may be incorrect.

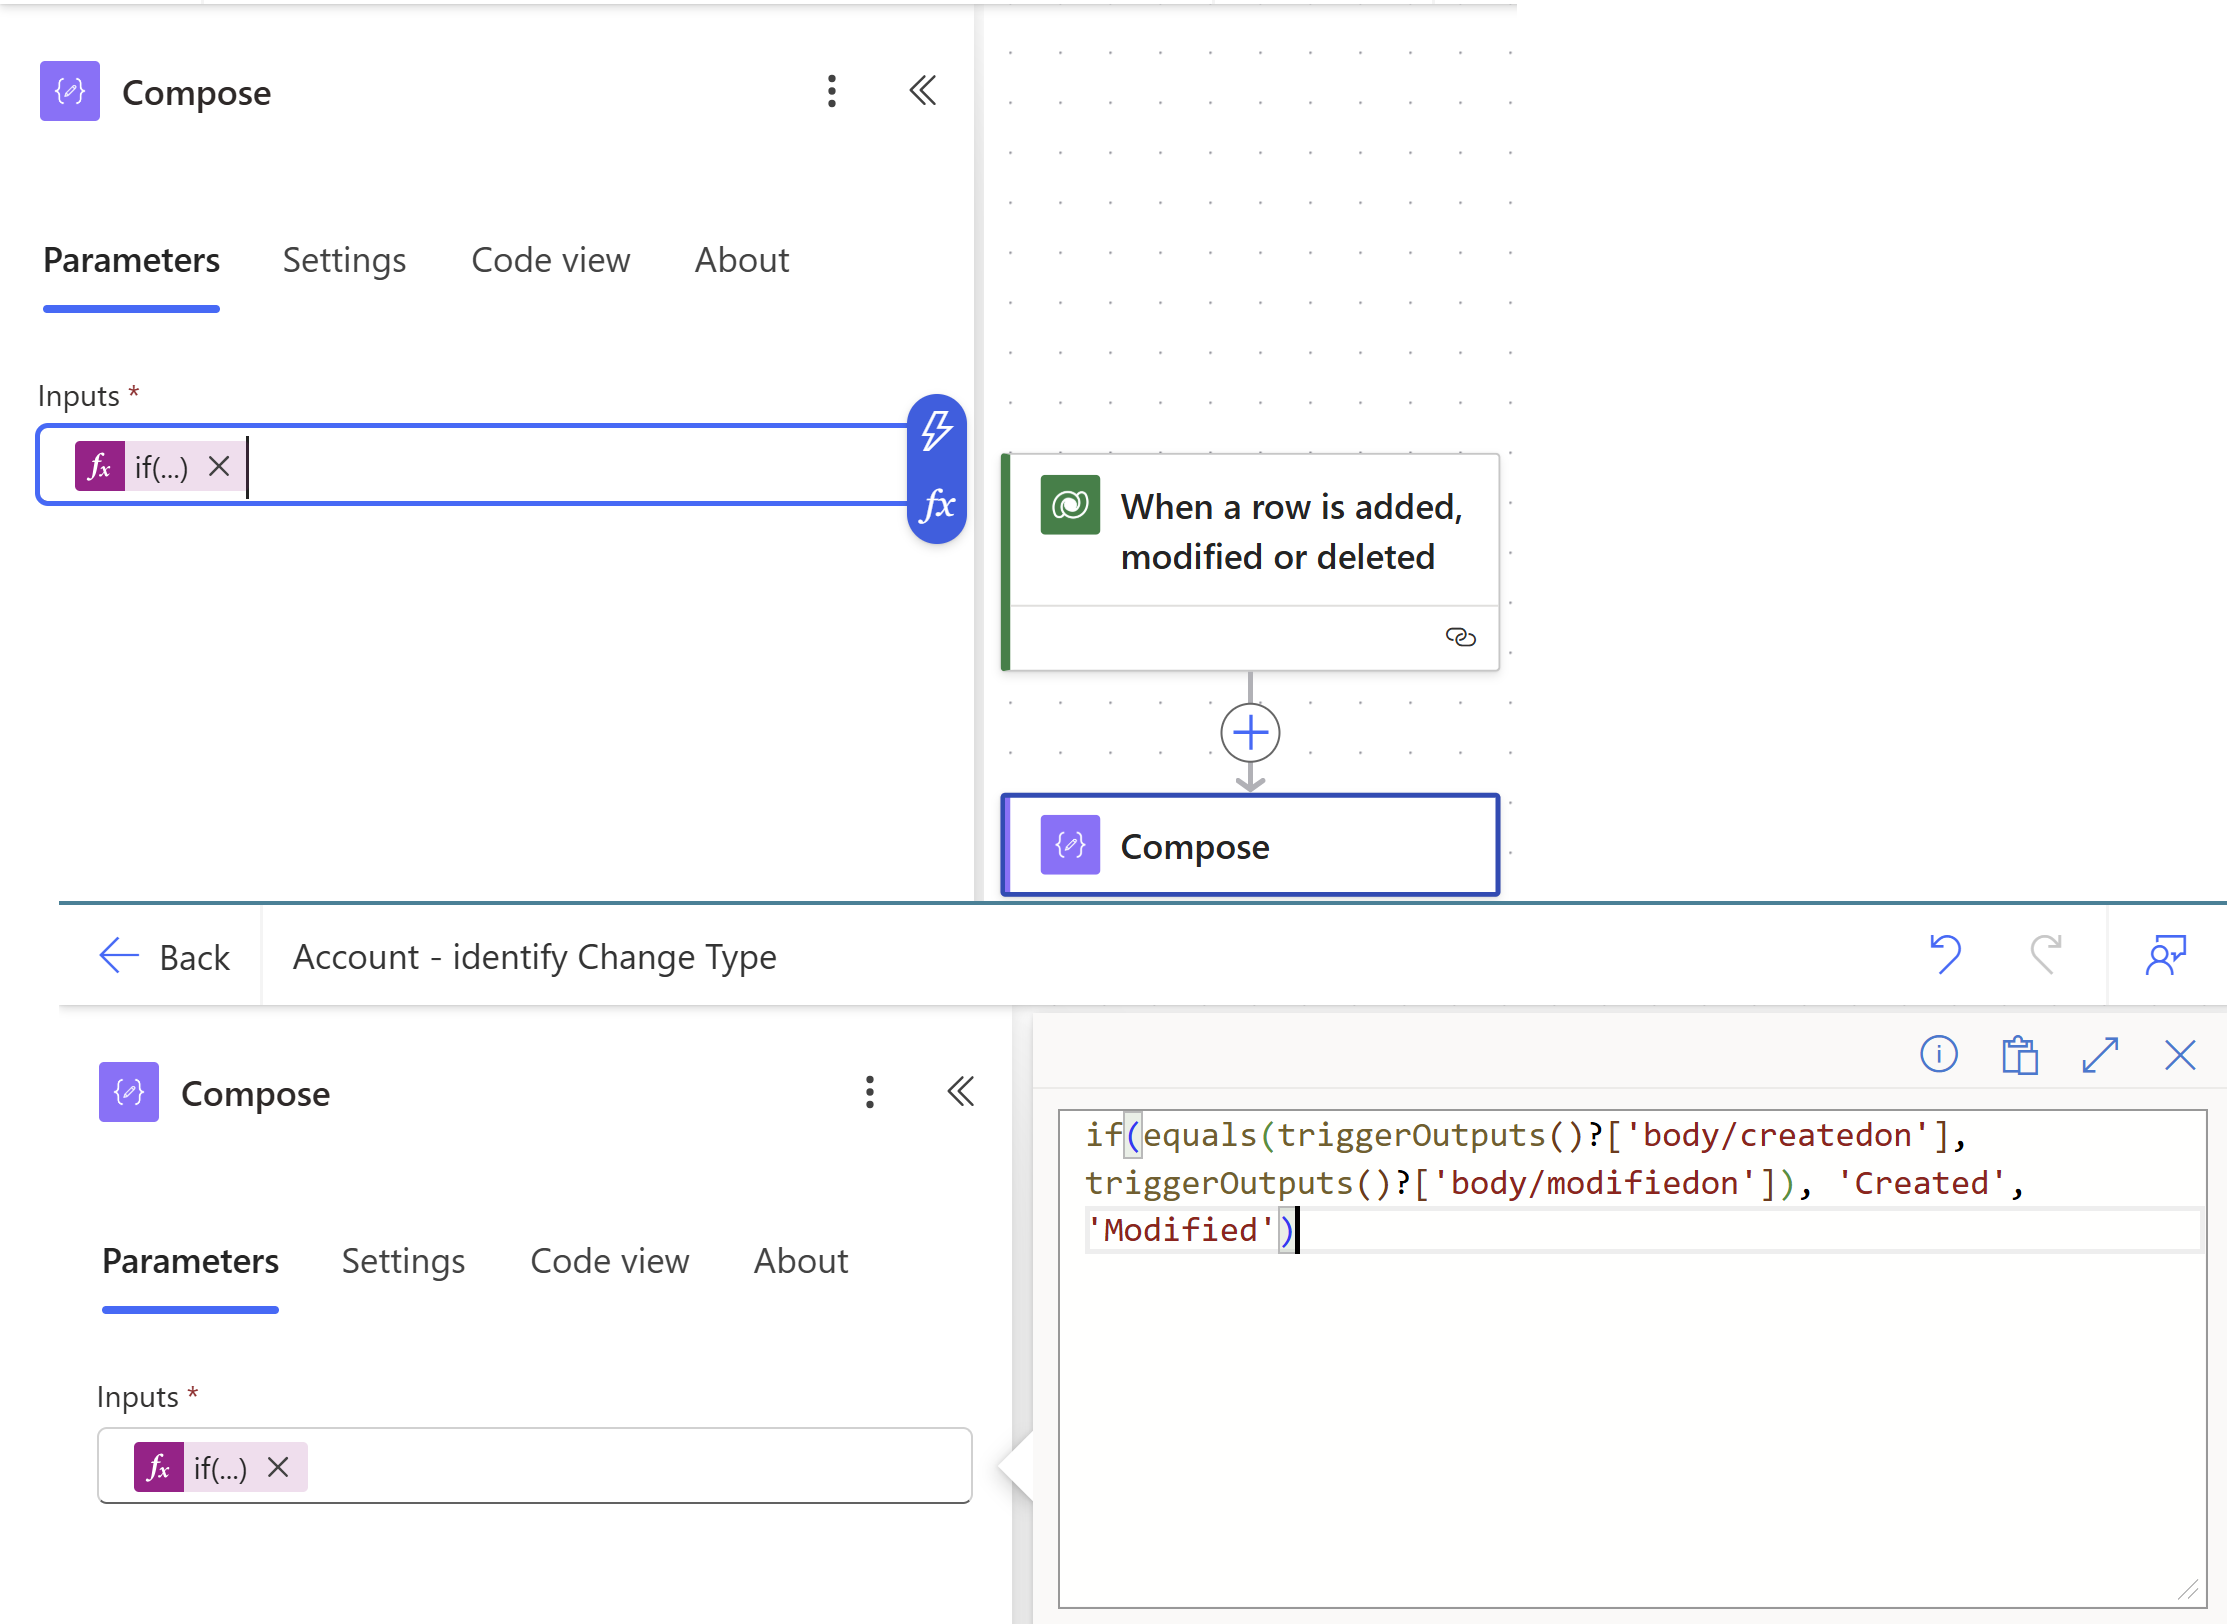
  • Add a “Compose” action.
  • In the compose properties, specify the following expression. This used to determine whether a record was just created or has been modified since its creation.
if(equals(triggerOutputs()?[‘body/createdon’], triggerOutputs()?[‘body/modifiedon’]), ‘Created’, ‘Modified’)

What does the expression mean?

  • triggerOutputs()?[‘body/createdon’]: This retrieves the timestamp of when the item (like a record or file) was created.
  • triggerOutputs()?[‘body/modifiedon’]: This retrieves the timestamp of when the item was last modified.
  • equals(…): This function checks if the two timestamps are exactly the same.
  • if(condition, ‘Created’, ‘Modified’): This is a conditional statement:
    • If the condition is true (i.e., the item was not modified after creation), it returns ‘Created’.
    • If the condition is false (i.e., the item was modified after creation), it returns ‘Modified’.

A screenshot of a computer

AI-generated content may be incorrect.

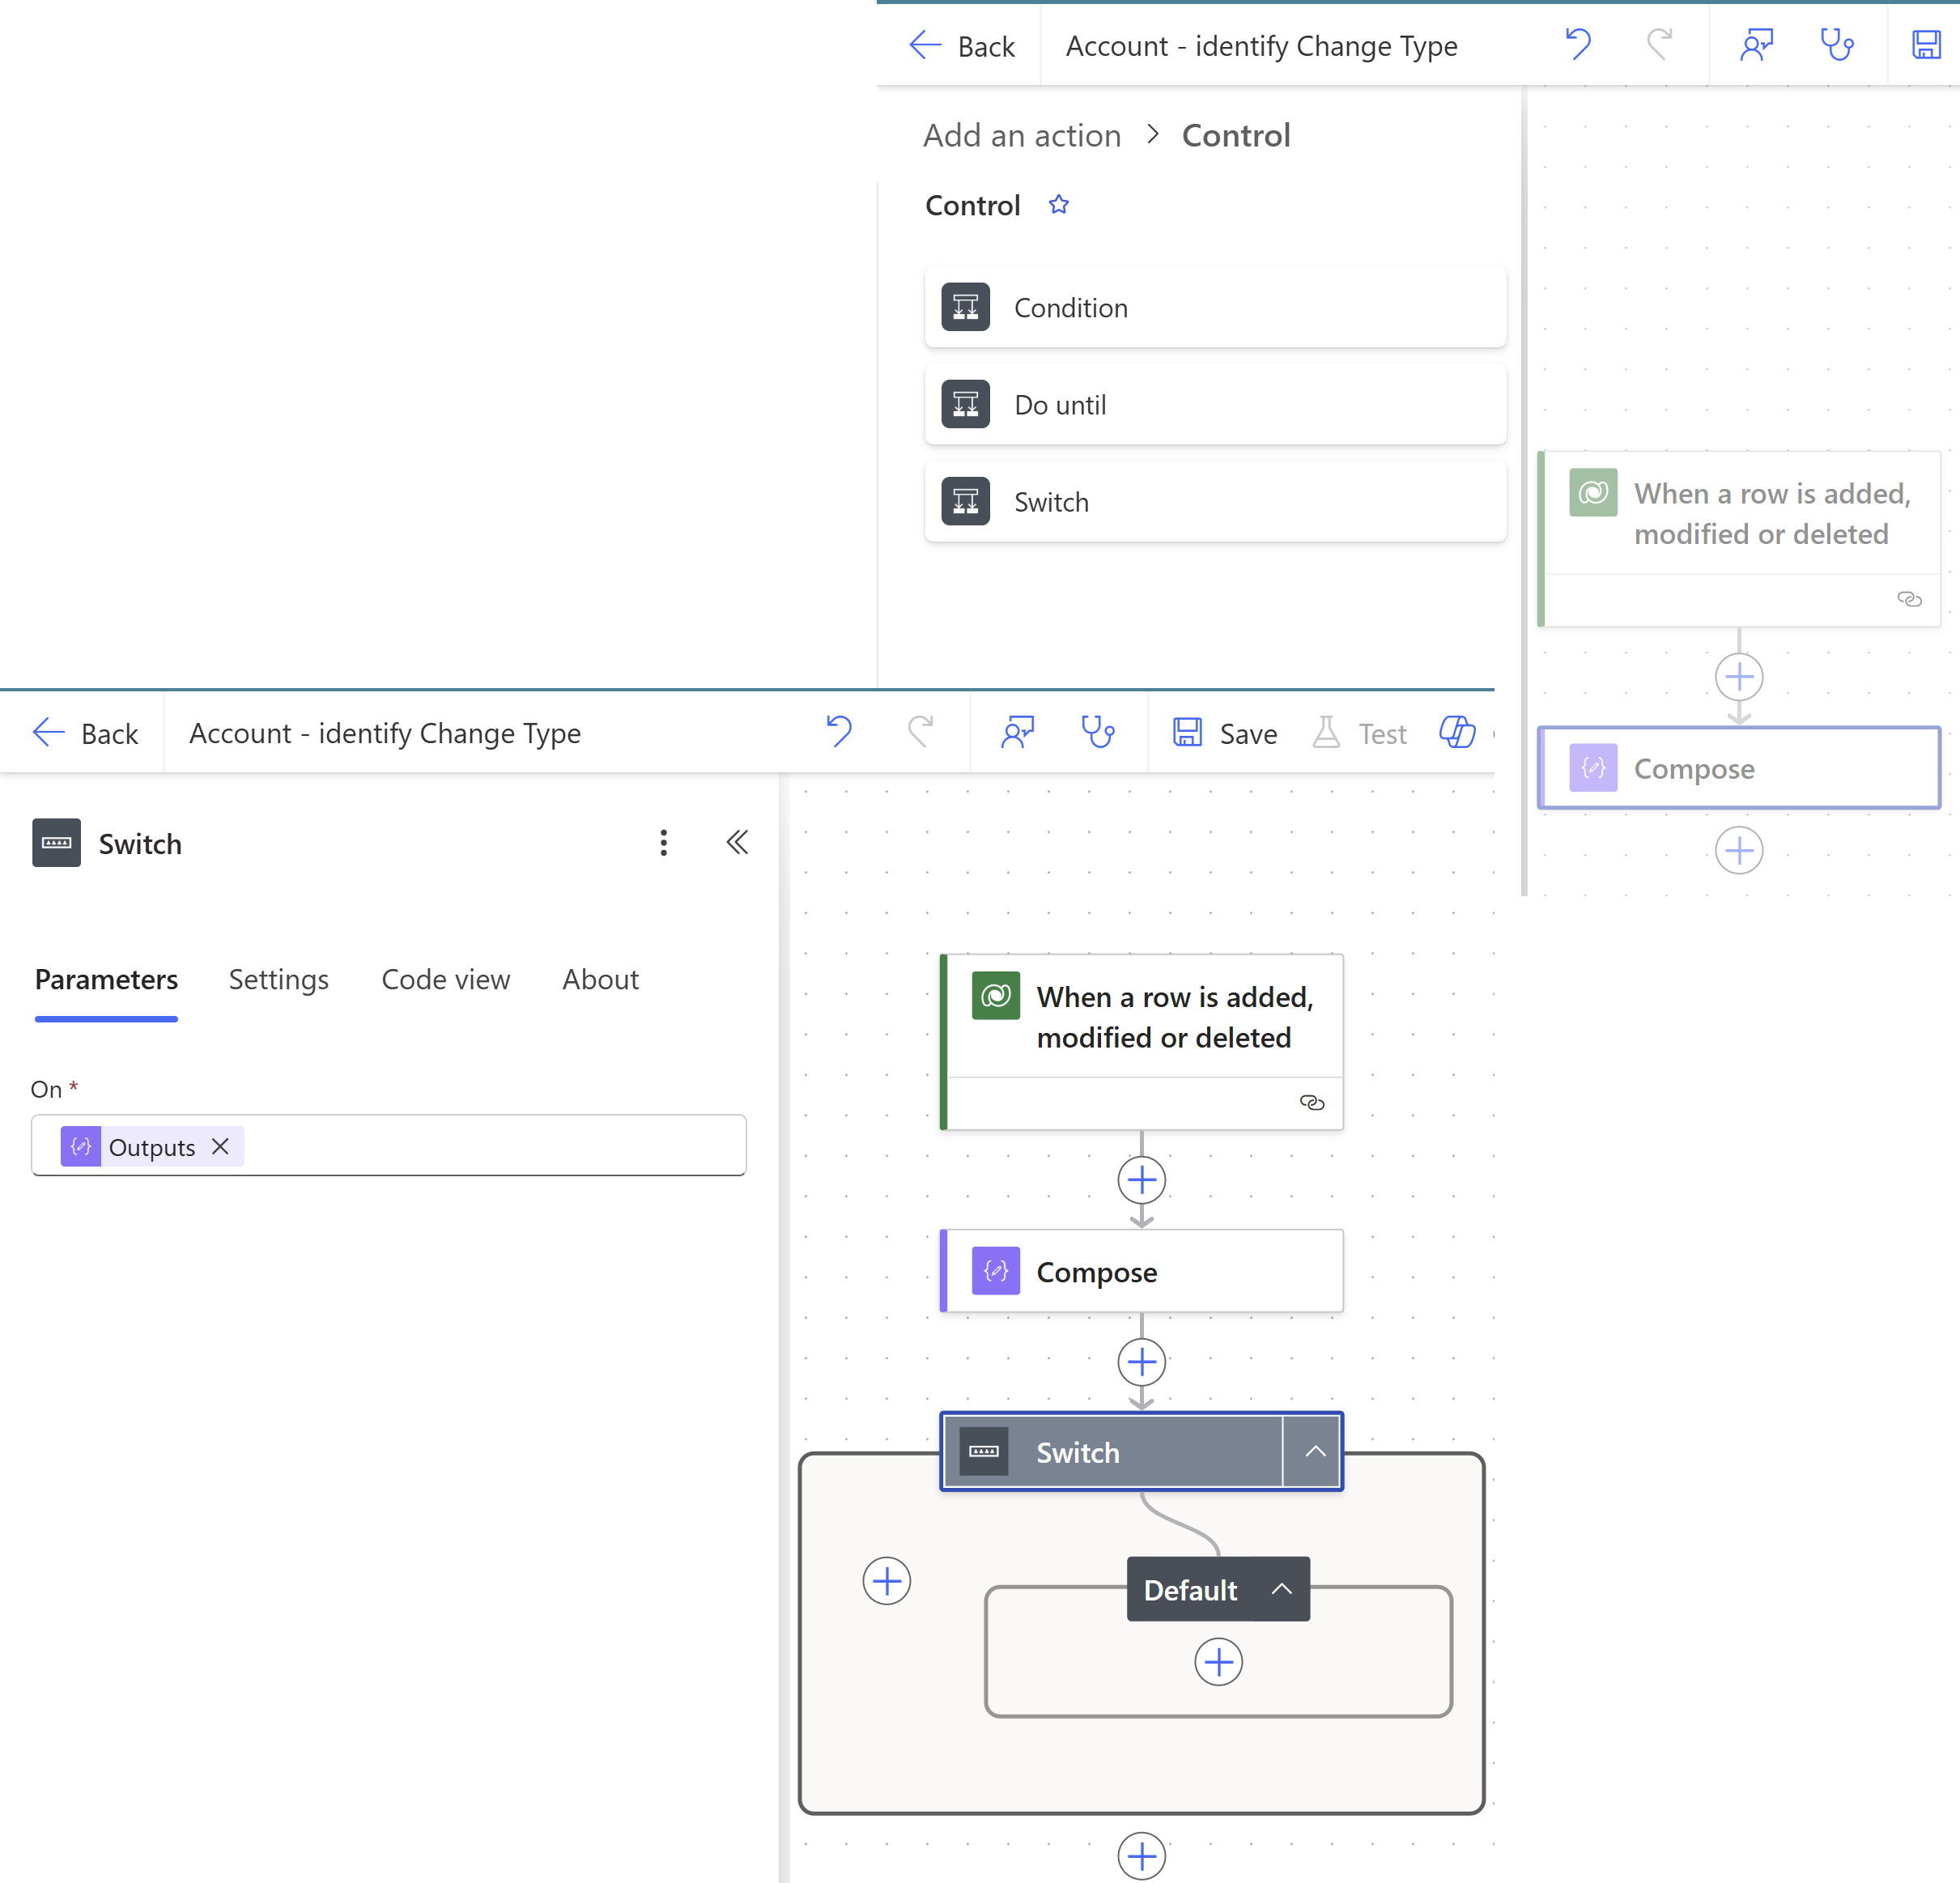
  • Add a “Switch” control.
  • In Switch control parameter specify the output from Compose action.
    Screens screenshot of a computer

AI-generated content may be incorrect.
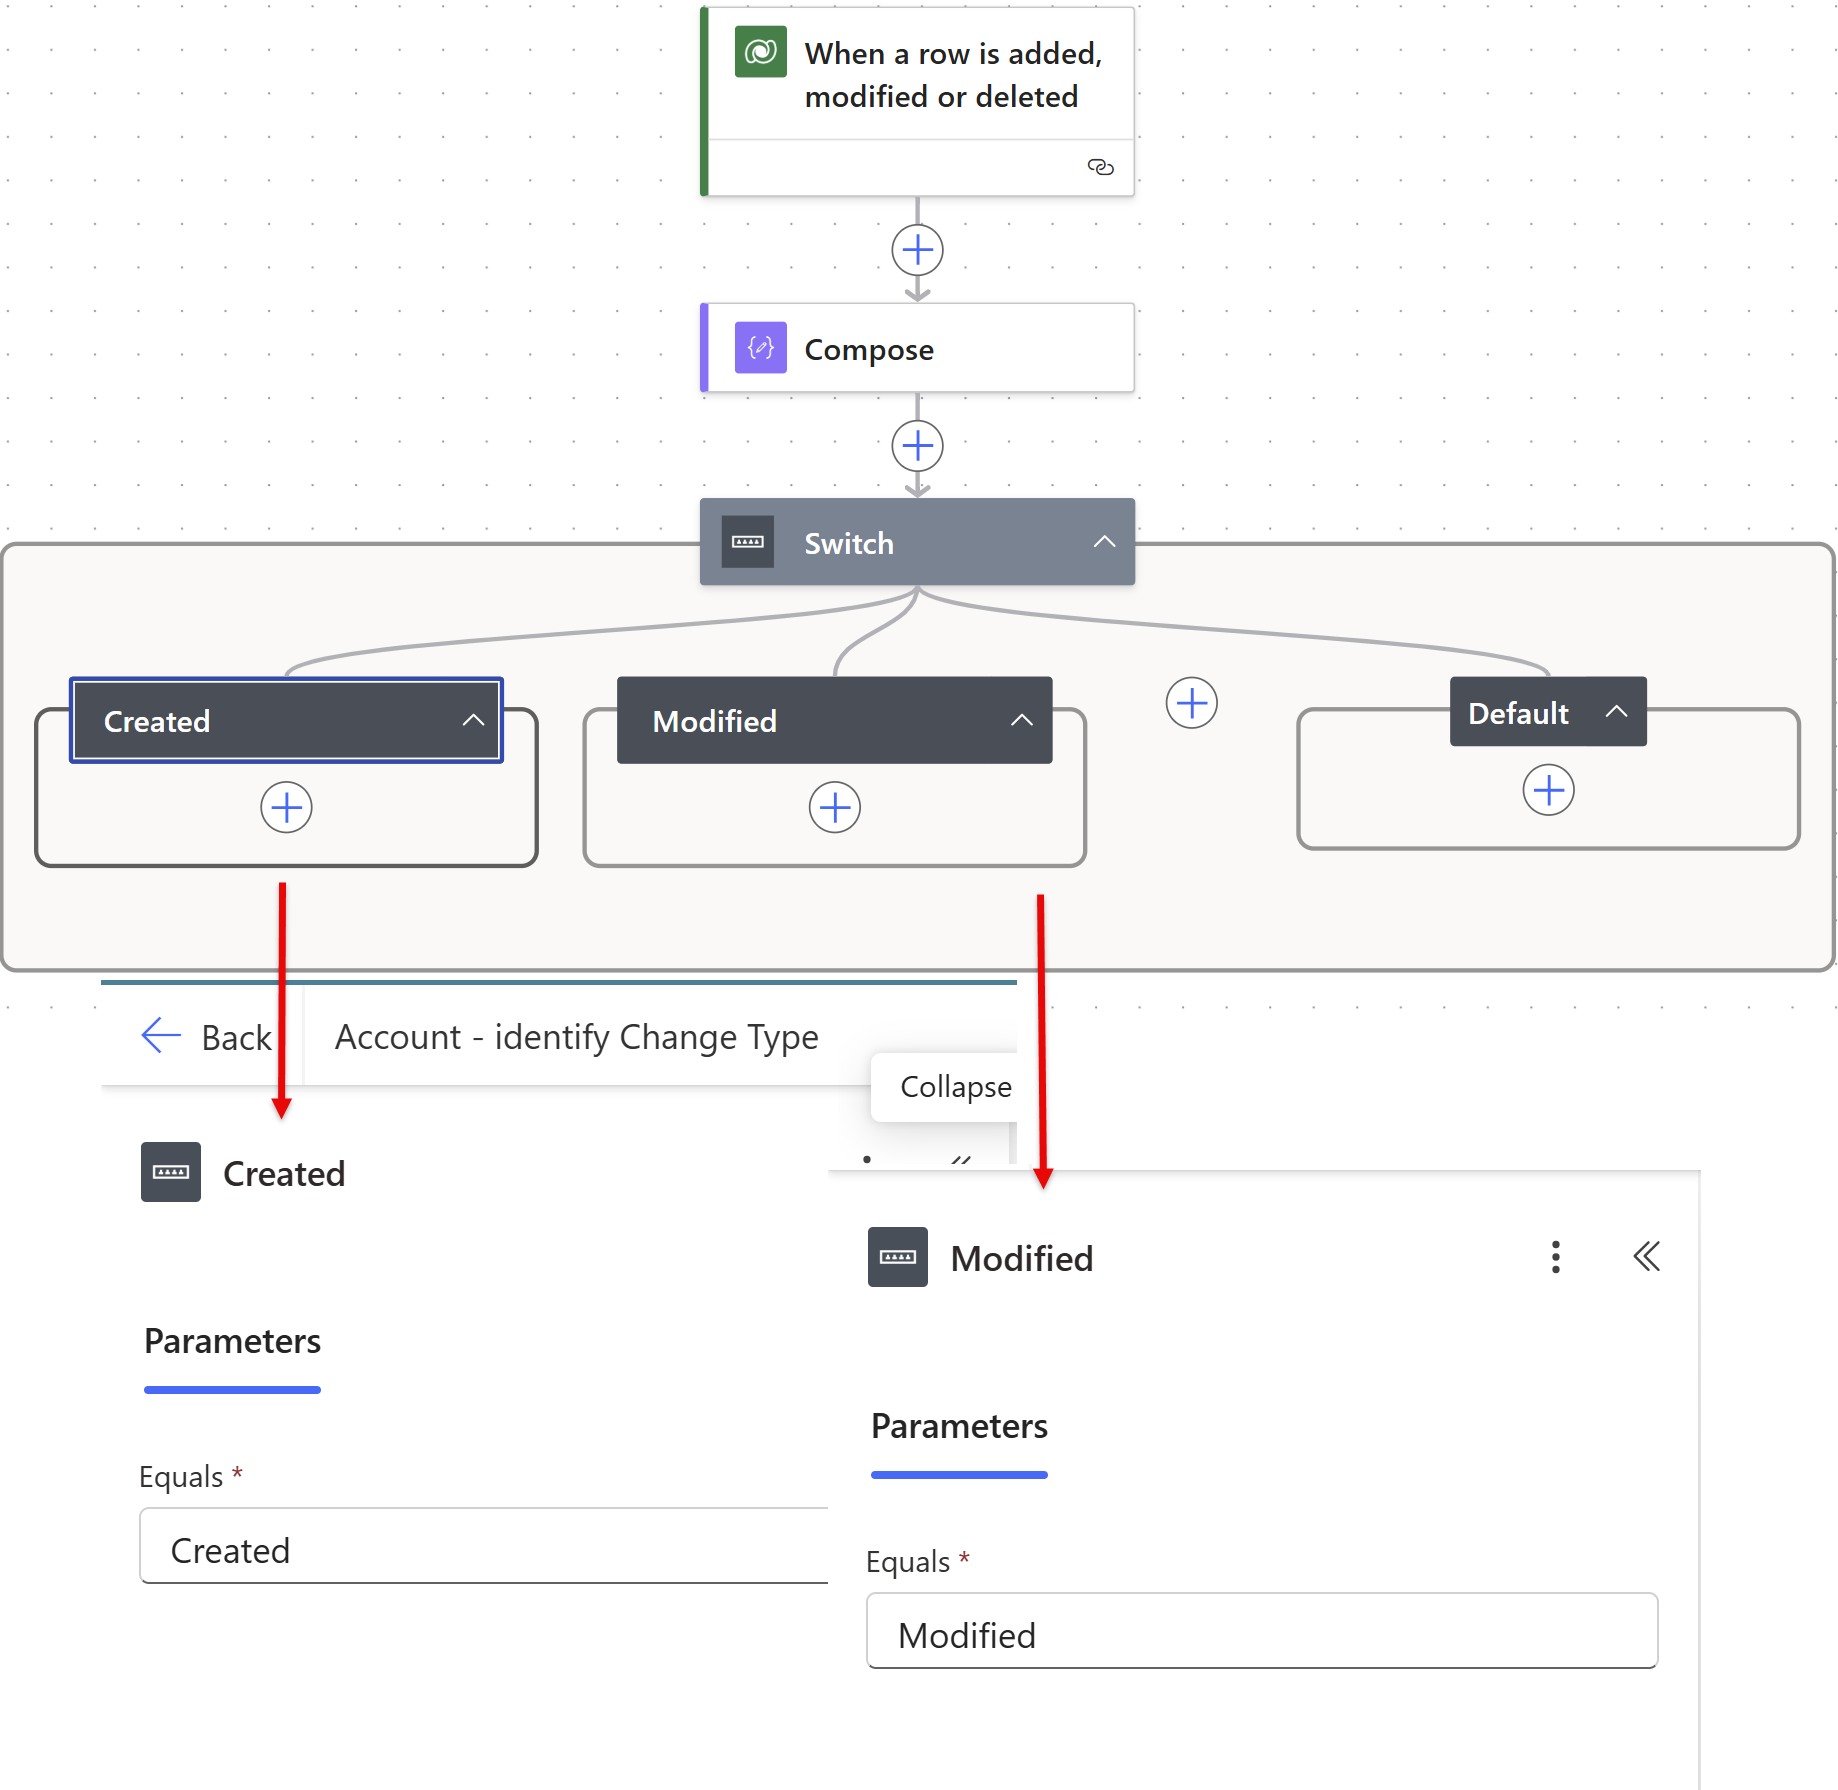
  • Now add cases with following settings:
    • Case 1 equals ‘Created’
    • Case 2 equals ‘Modified’
  • Rename the Case labels (optional).

A screenshot of a computer

AI-generated content may be incorrect.

There you go, now within each case you can carry out relevant actions! 😊

Posted in D365 Customer Engagement (CRM), D365 Tips & Tricks, Power Automate | Comments Off on How to identify if a row was created or modified in power automate flow and “Switch” accordingly?

How to work around Business Closure time zone discrepancy?

Issue Description

The following issue has been observed at the time this article is written and depending on when you are reading it, the issue may have been resolved by Microsoft!

The article outlines a time zone-related issue when setting up business closures in Microsoft Dynamics 365 Project Operations. Here’s a summary of the problem:

Context

Two business closures were created using:

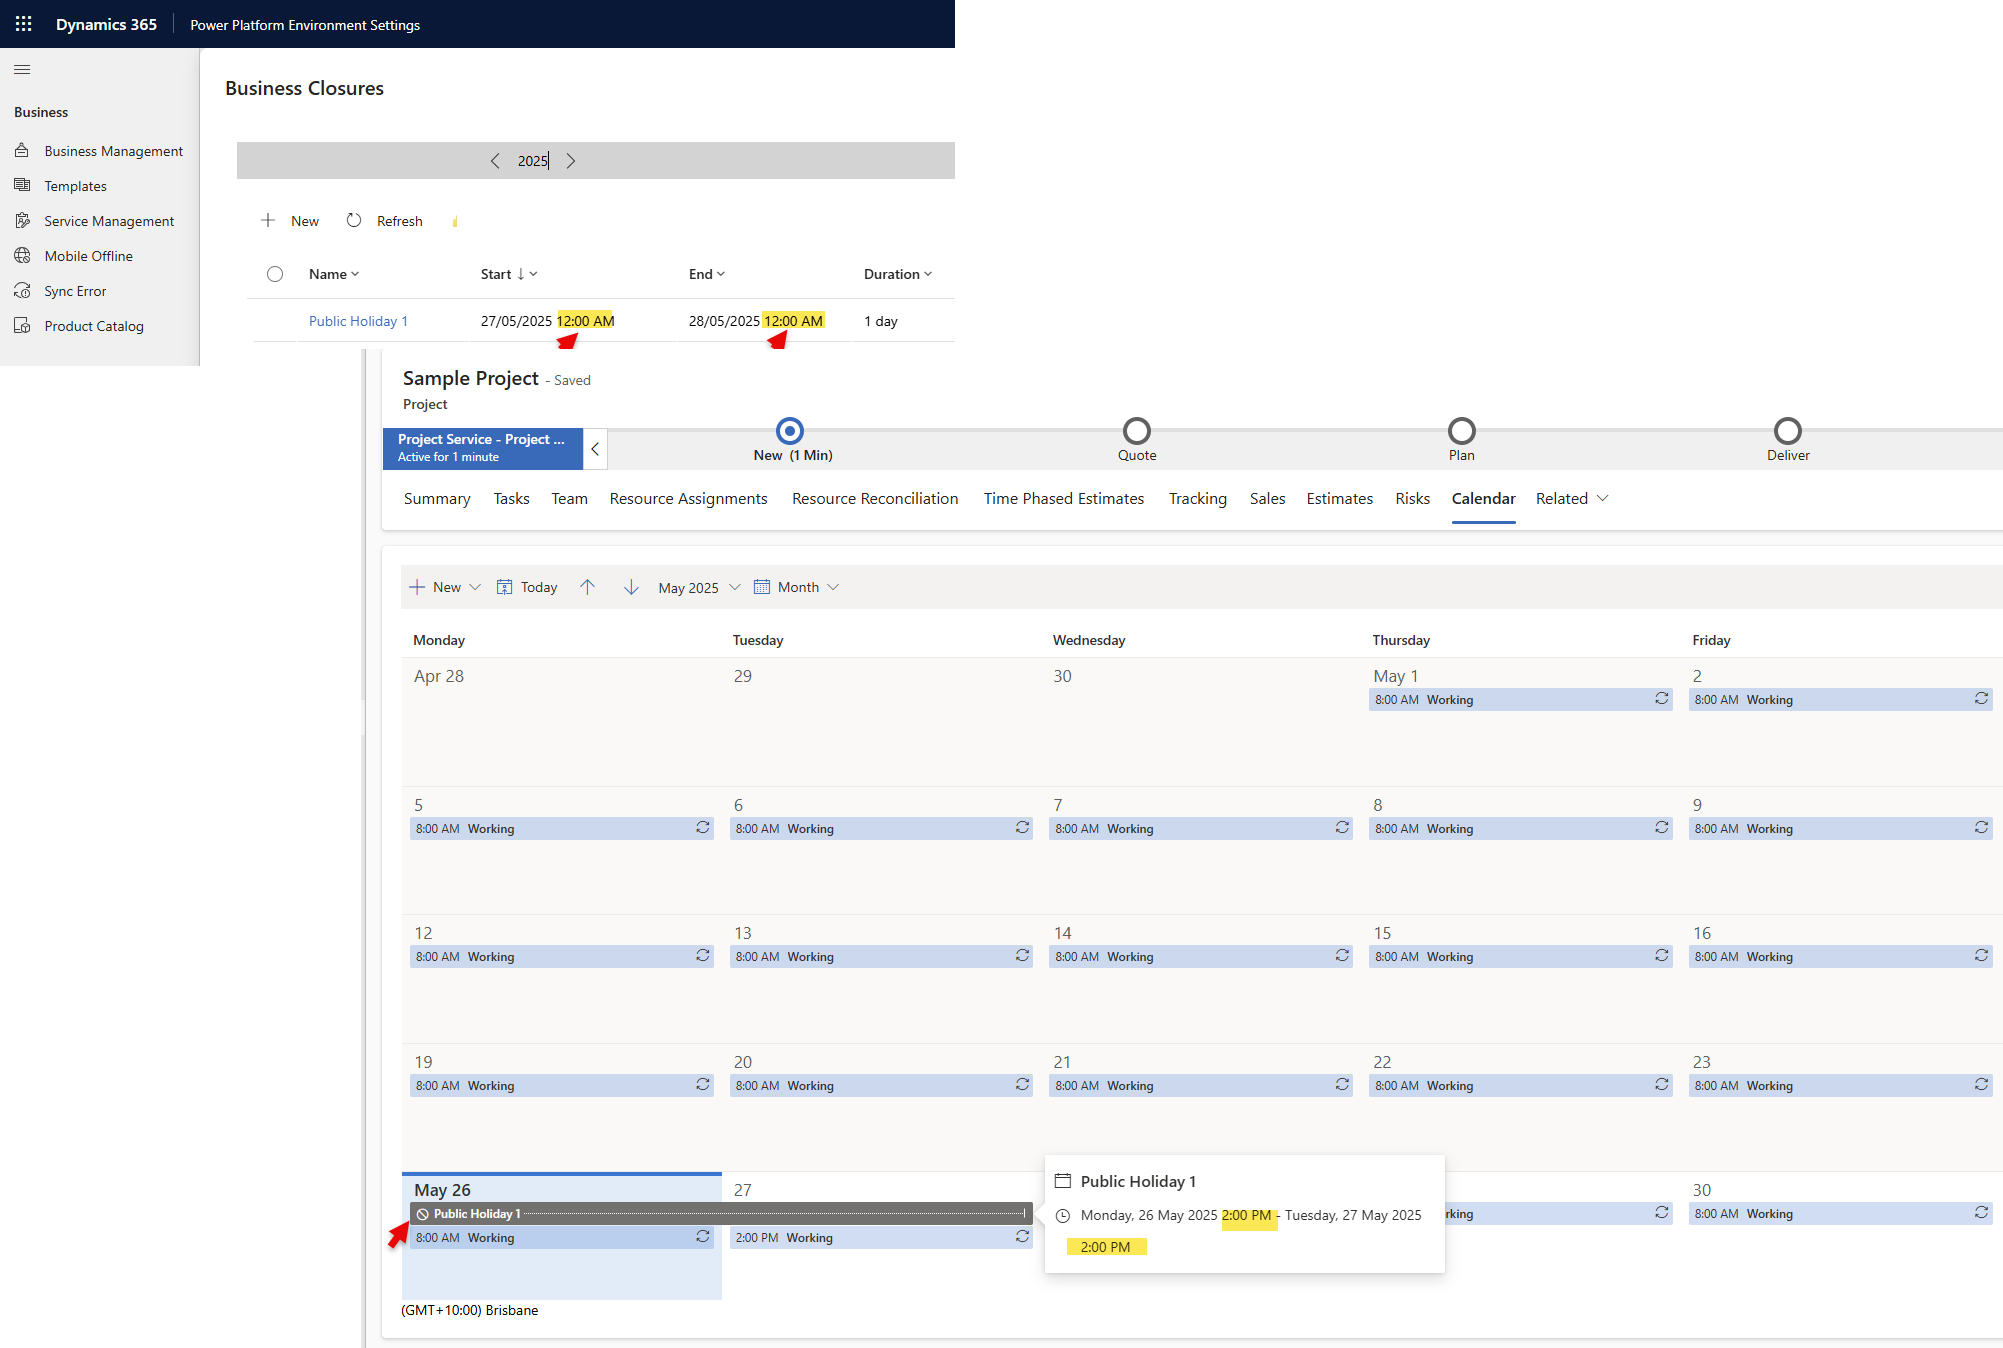
  1. Advanced Settings (Modern UI) – for “Public Holiday 1” on 27/05/2025
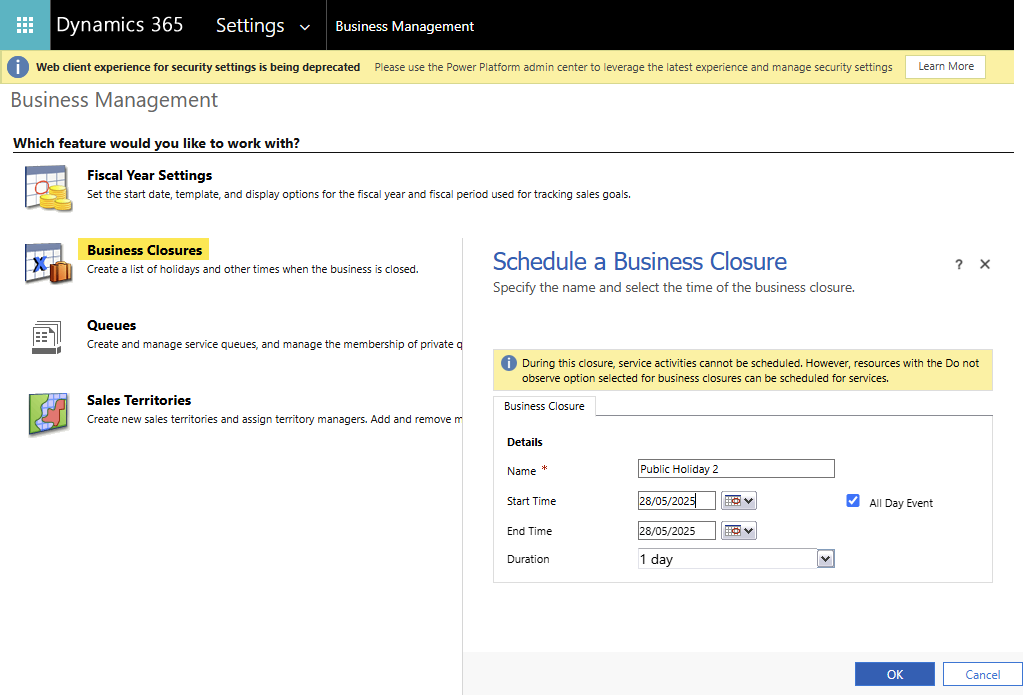
  2. Classic Settings (Legacy UI) – for “Public Holiday 2” on 28/05/2025

Note:

  • System Time zone settings I (GMT+10:00) Brisbane.
  • The dates used in the following scenario are only for demonstration purposes.

Problem Observed

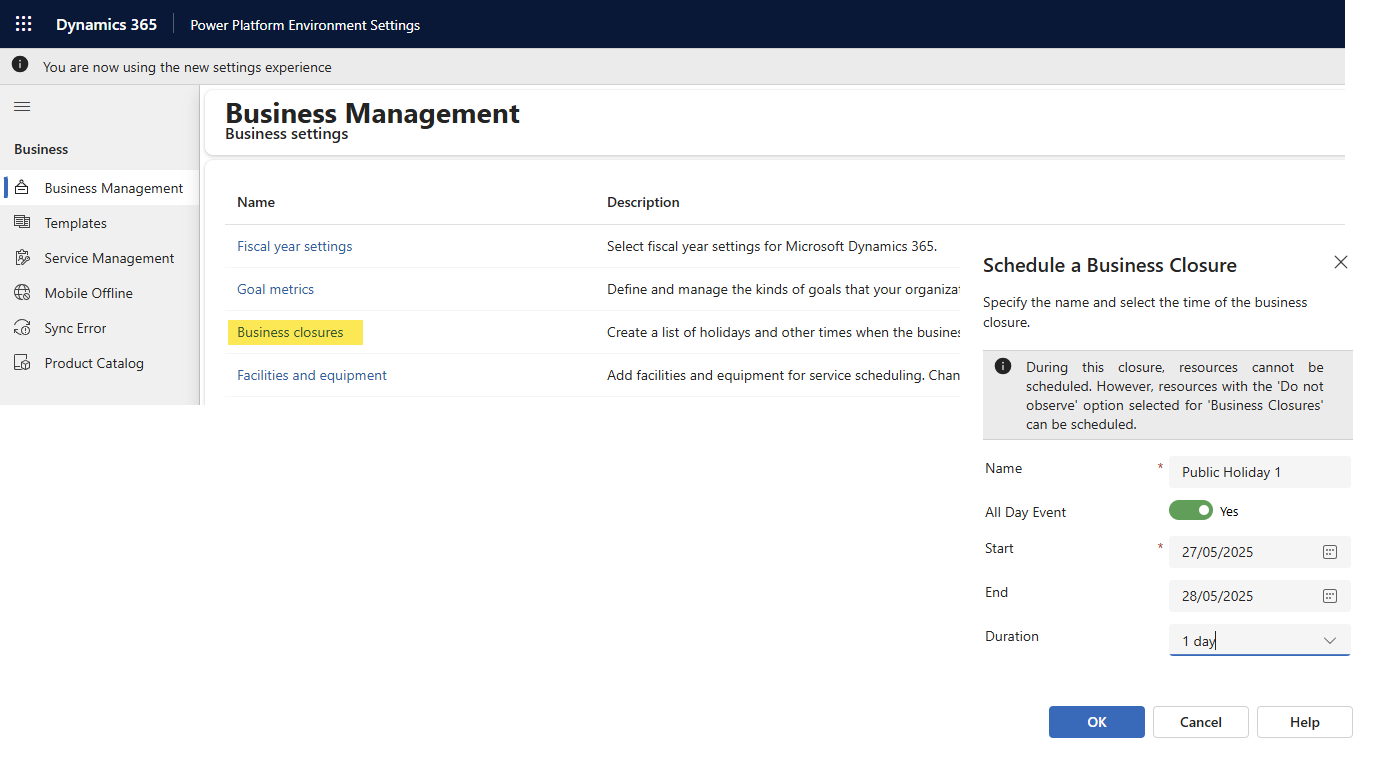
  • Advanced Settings (Modern UI):
    • In D365 Project Operations, go to advanced settings, i.e. Power Platform Environment Settings.
    • Click Business Management >> Business Closures
    • Setup a business closer, say “Public Holiday 1” with:
      • Start date: 27/05/2025
      • Duration: 1 day

A screenshot of a computer

AI-generated content may be incorrect.

    • The system sets the start time to 12:00 AM UTC, not adjusting for the local time zone (GMT+10:00 Brisbane).
    • Result: In the project calendar, the closure appears incorrectly, with spillage across days.

A screenshot of a computer

AI-generated content may be incorrect.

  • Classic Settings (Legacy UI):
    • Open classic settings page
    • Go to Settings >> Business Management >> Business Closures
    • Setup a business closer, say “Public Holiday 2” with:
      • Start date: 28/05/2025
      • Duration: 1 day

A screenshot of a computer

AI-generated content may be incorrect.

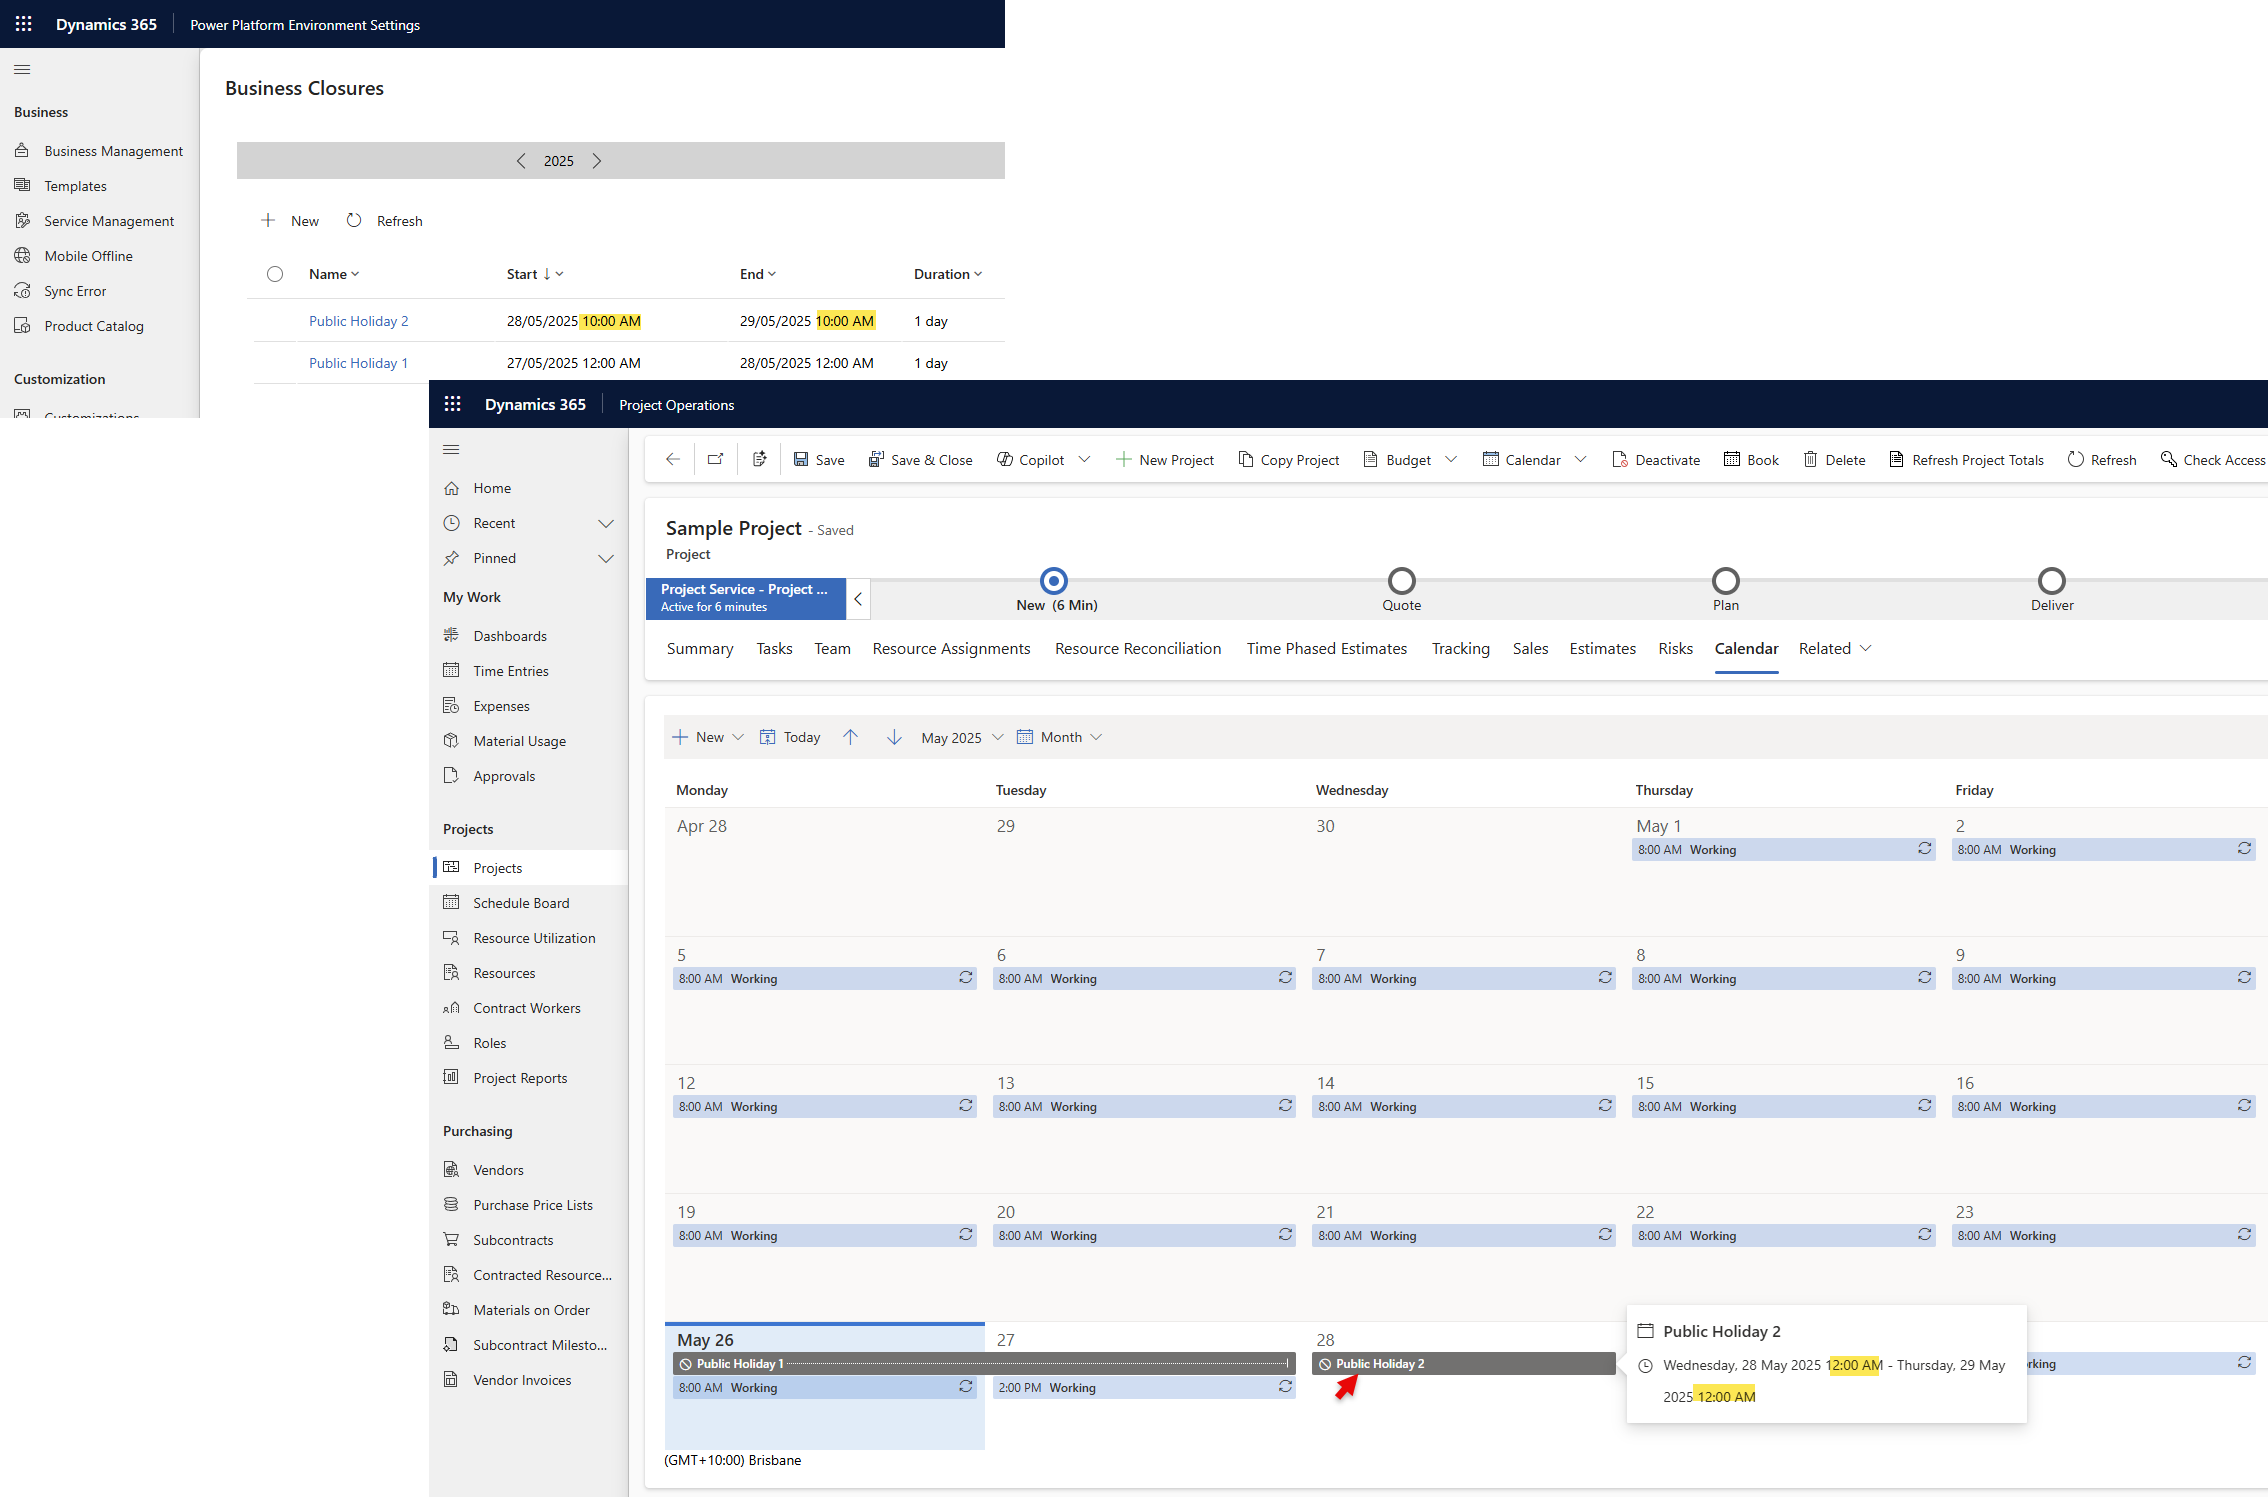
  • The system sets the start time to 10:00 AM, correctly adjusted to local time.
  • Result: The closure appears correctly in the calendar as a single-day event.

A screenshot of a computer

AI-generated content may be incorrect.

Conclusion

There is a time zone handling inconsistency between the Advanced and Classic settings pages. The modern interface does not correctly apply the local time zone, leading to incorrect calendar displays.

Workaround is to set the business closure using Classic Settings page.

Cheers Dude

Posted in D365 Customer Engagement (CRM), D365 Project Operations, D365 Tips & Tricks | Comments Off on How to work around Business Closure time zone discrepancy?

How to hide +New option from lookup fields in D365?

In a Model-Driven App, a lookup field is a special type of field that allows you to reference records from another entity or table. Essentially, it enables linking data across different entities or tables.

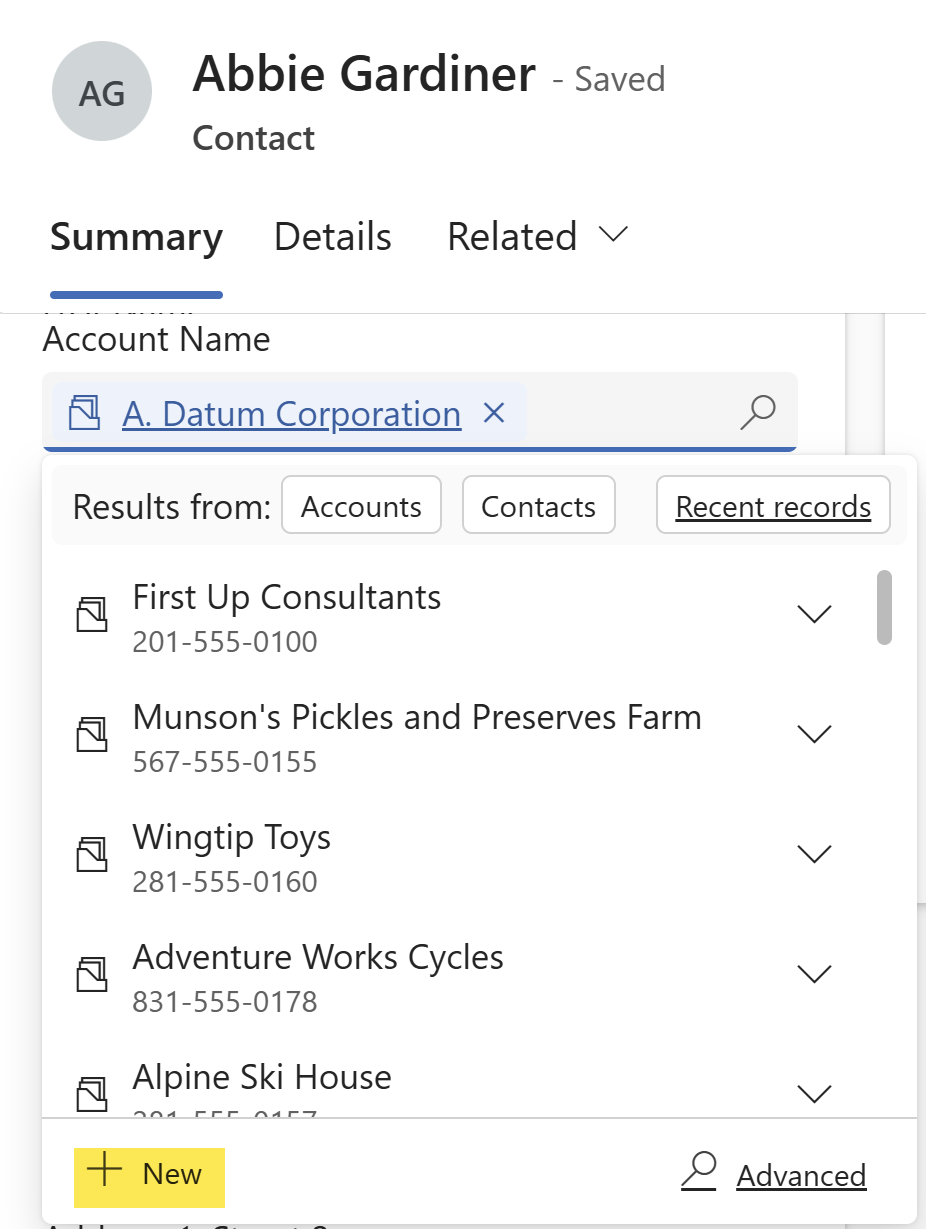
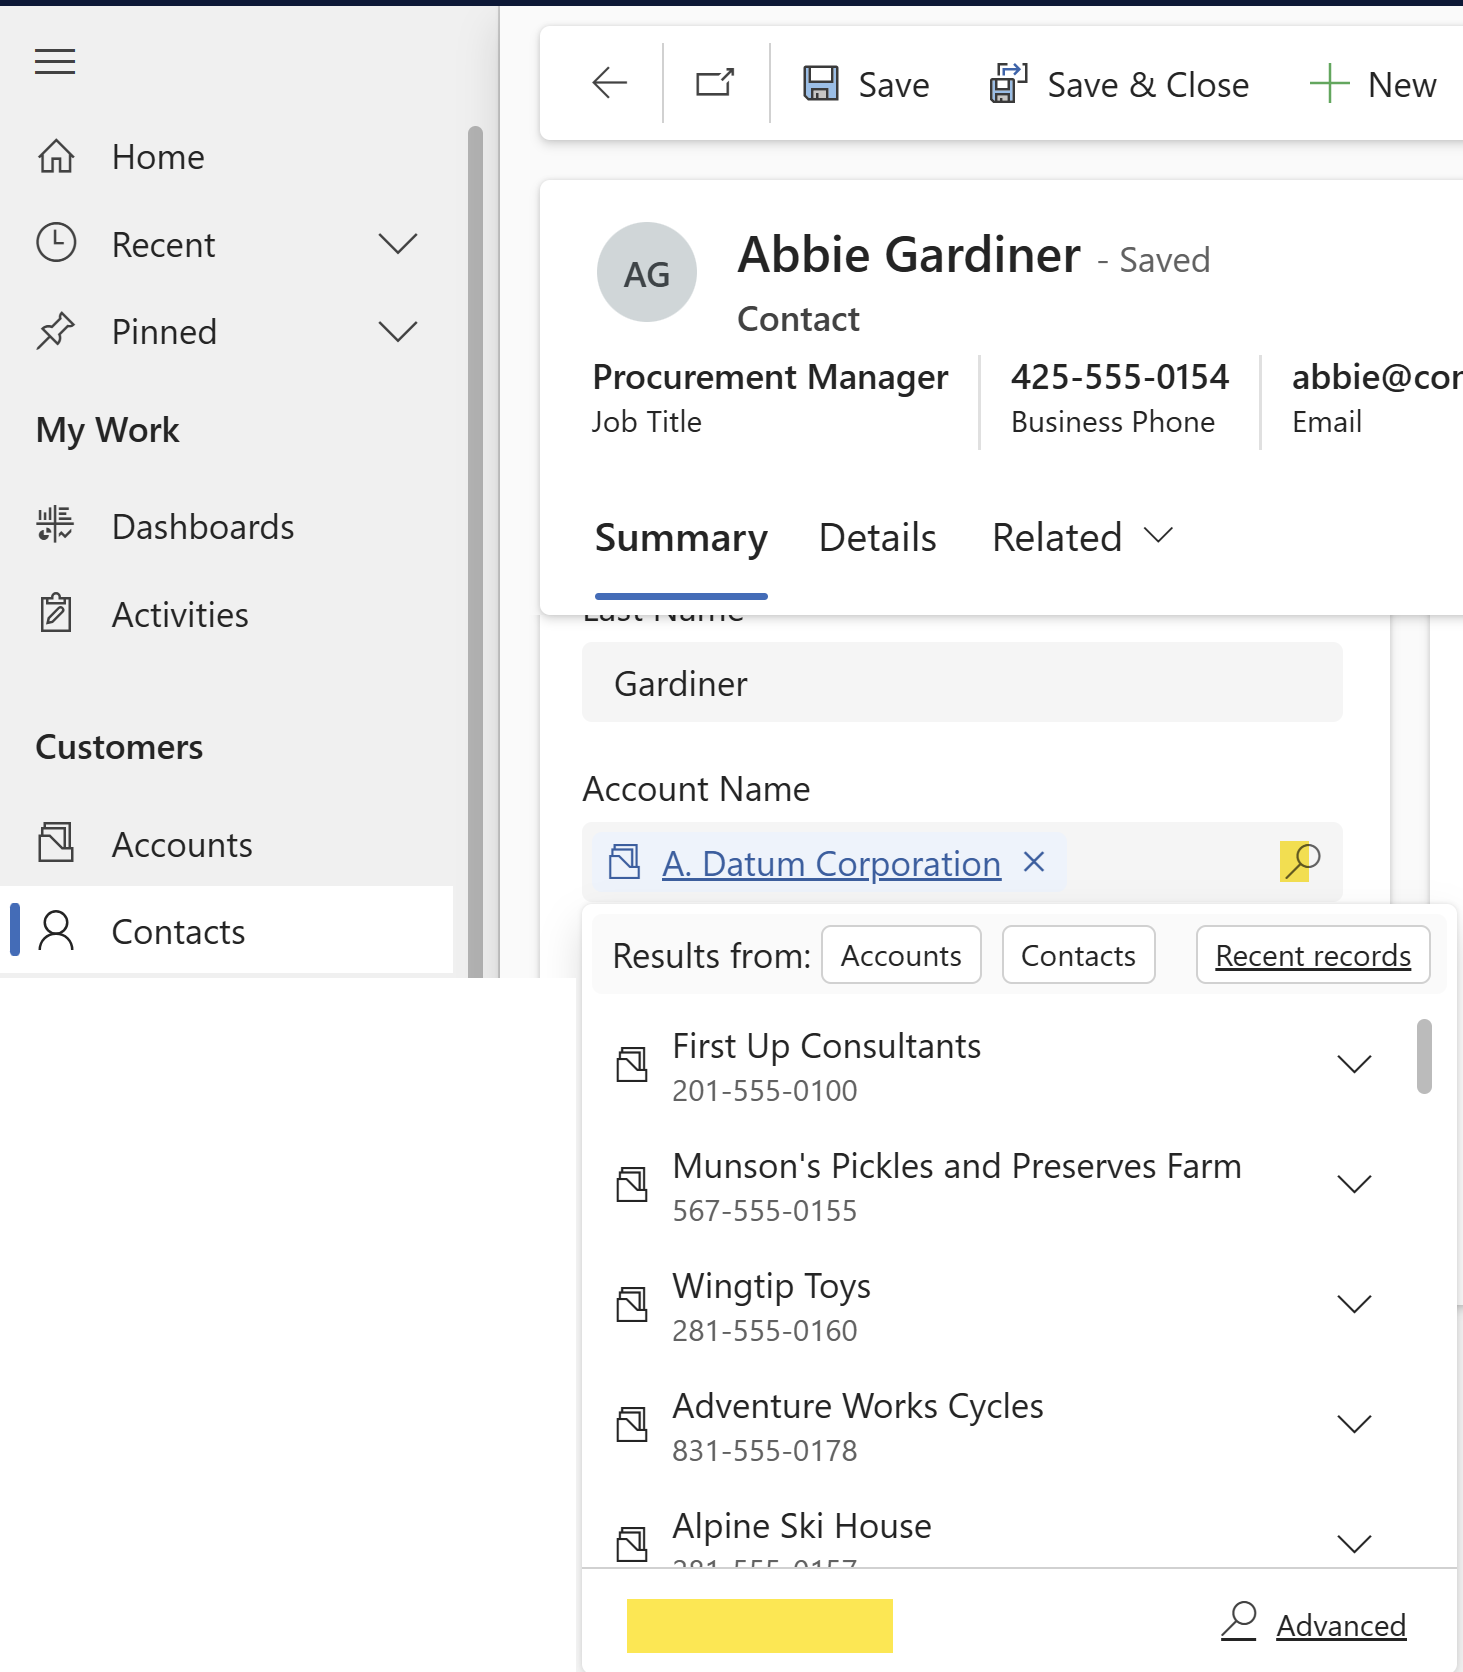
Typically, lookup fields include a “+ New” option, which lets users create a new record in the related table and automatically associate it with the current record.

A screenshot of a computer

AI-generated content may be incorrect.

What happens if a user tries to create a new record from a lookup field, but they don’t have access to the related entity?
In such cases, the best approach is to prevent the user from creating a new record directly from the lookup field by hiding the “+ New” button.

There are two common ways to restrict users from creating new records via lookup fields:

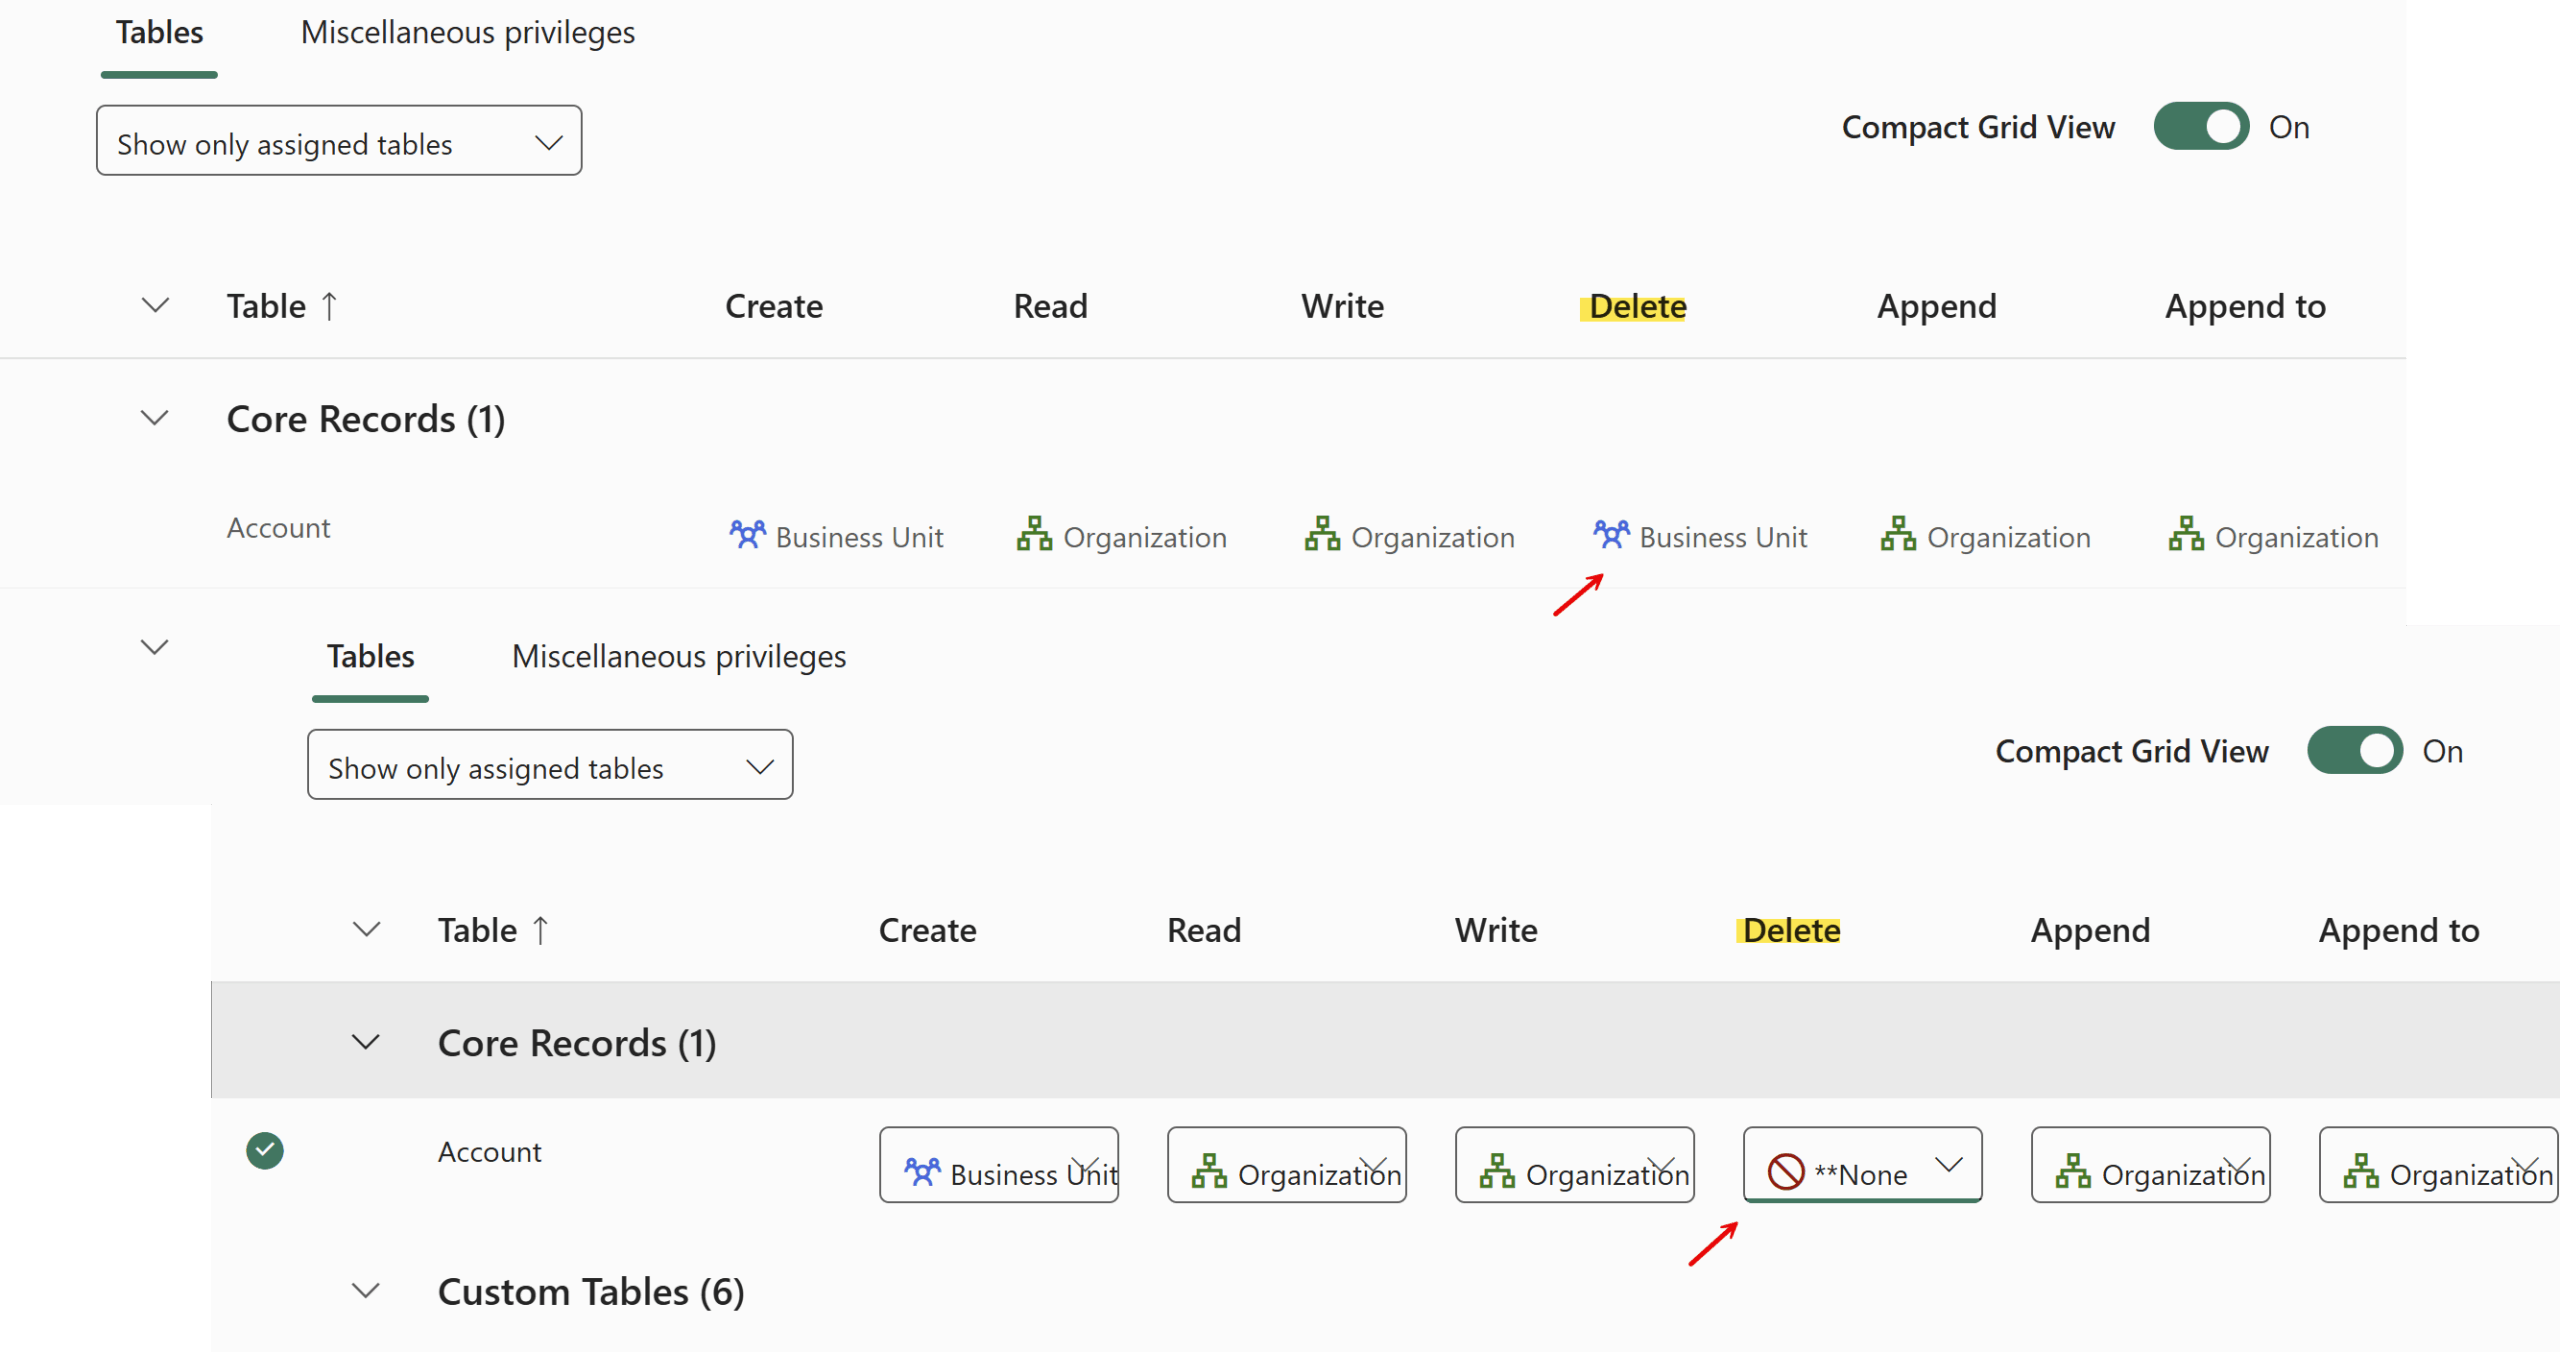
  1. Remove the Create privilege for the target entity in the user’s security role.
  2. Hide the “+ New” button in the lookup field by modifying the form XML using tools like FormXml Manager.

Removing the Create Privilege for a Target Entity

To prevent users from creating new records for a specific entity, follow these steps to remove the Create privilege:

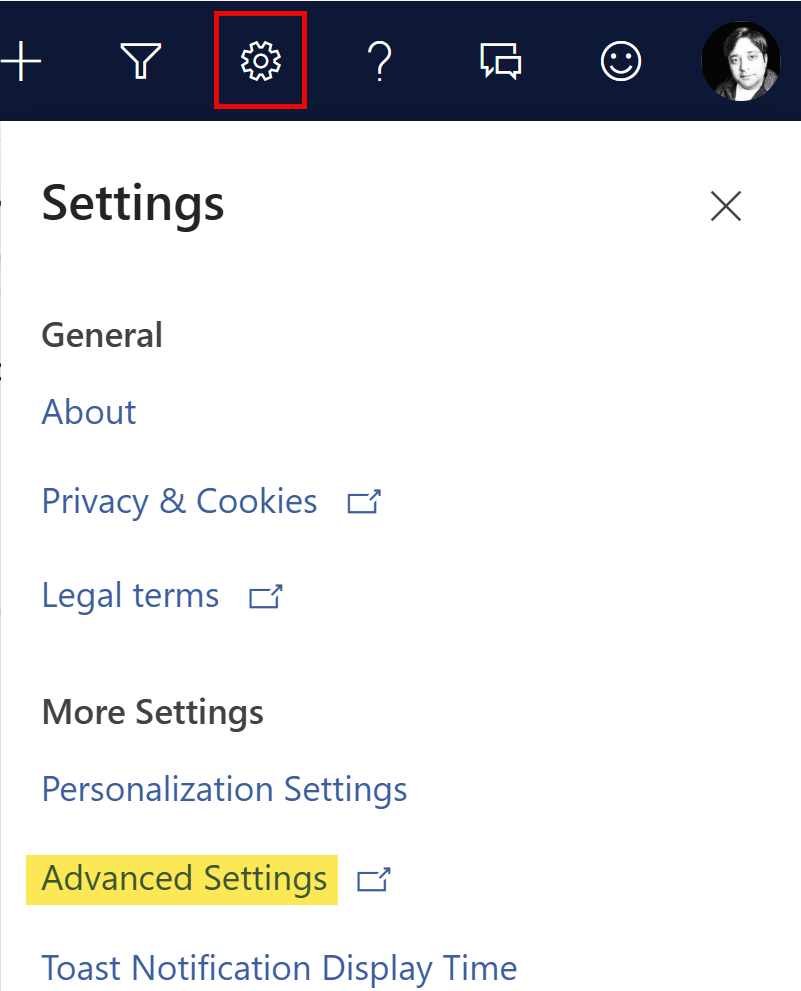
  1. Navigate to Advanced Settings in your environment.
    A screenshot of a computer

AI-generated content may be incorrect.
  2. Under Power Platform Environment Settings, Go to System > Security
  3. Open Security Roles, then select the specific role you want to modify
  4. Under the Core Records or Custom Entities tab, locate the target entity
  5. Remove the Create privilege for that entity.
  6. Click Save and Close to apply the changes.

A screenshot of a computer

AI-generated content may be incorrect.

Hiding the “+ New” Button Using XrmToolBox and FormXML Editor

To hide the “+ New” button in a lookup field using the XrmToolBox, follow these steps:

  1. Install XrmToolBox if you haven’t already
  2. Connect to your organization:
    • Launch XrmToolBox
    • Enter your credentials and select Office 365 as the deployment type
  3. Once connected, go to Tools and search for FormXmlManager
  4. Install the FormXML Manager Tool if it’s not already installed
  5. Reconnect to your organization and select the appropriate environment
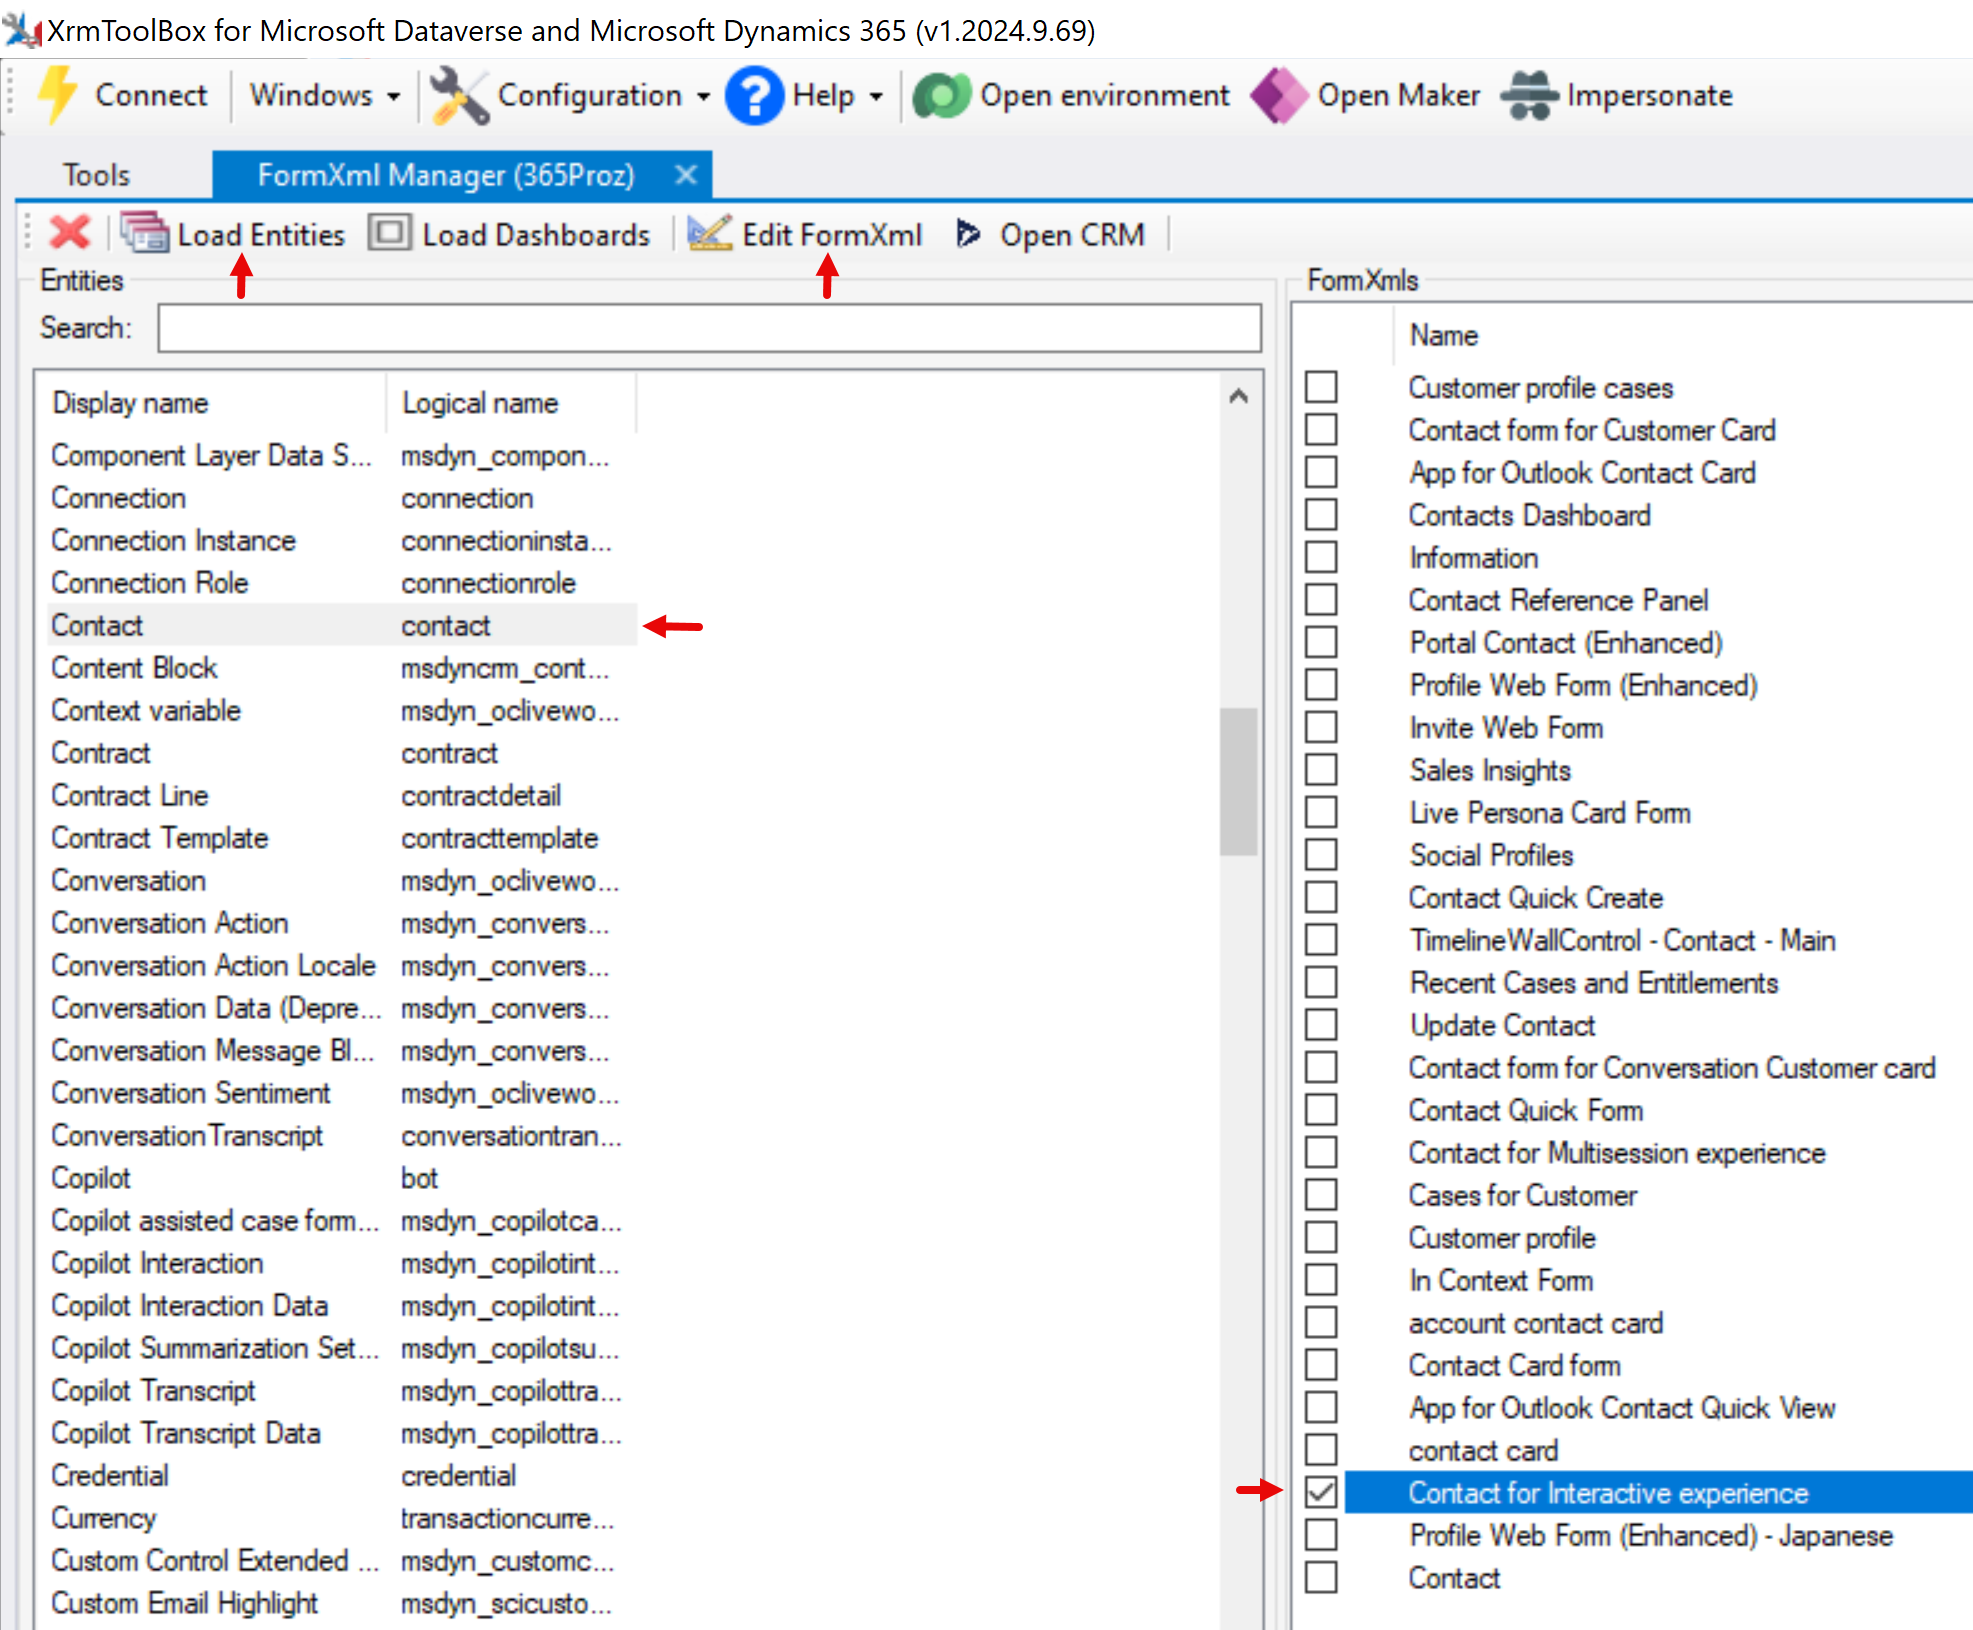
  6. Click Load Entities to retrieve the list of all entities.
  7. Select the desired entity, then choose the relevant form from the right-hand panel
  8. Click Edit Form XML to begin modifying the form and hide the “+ New” button
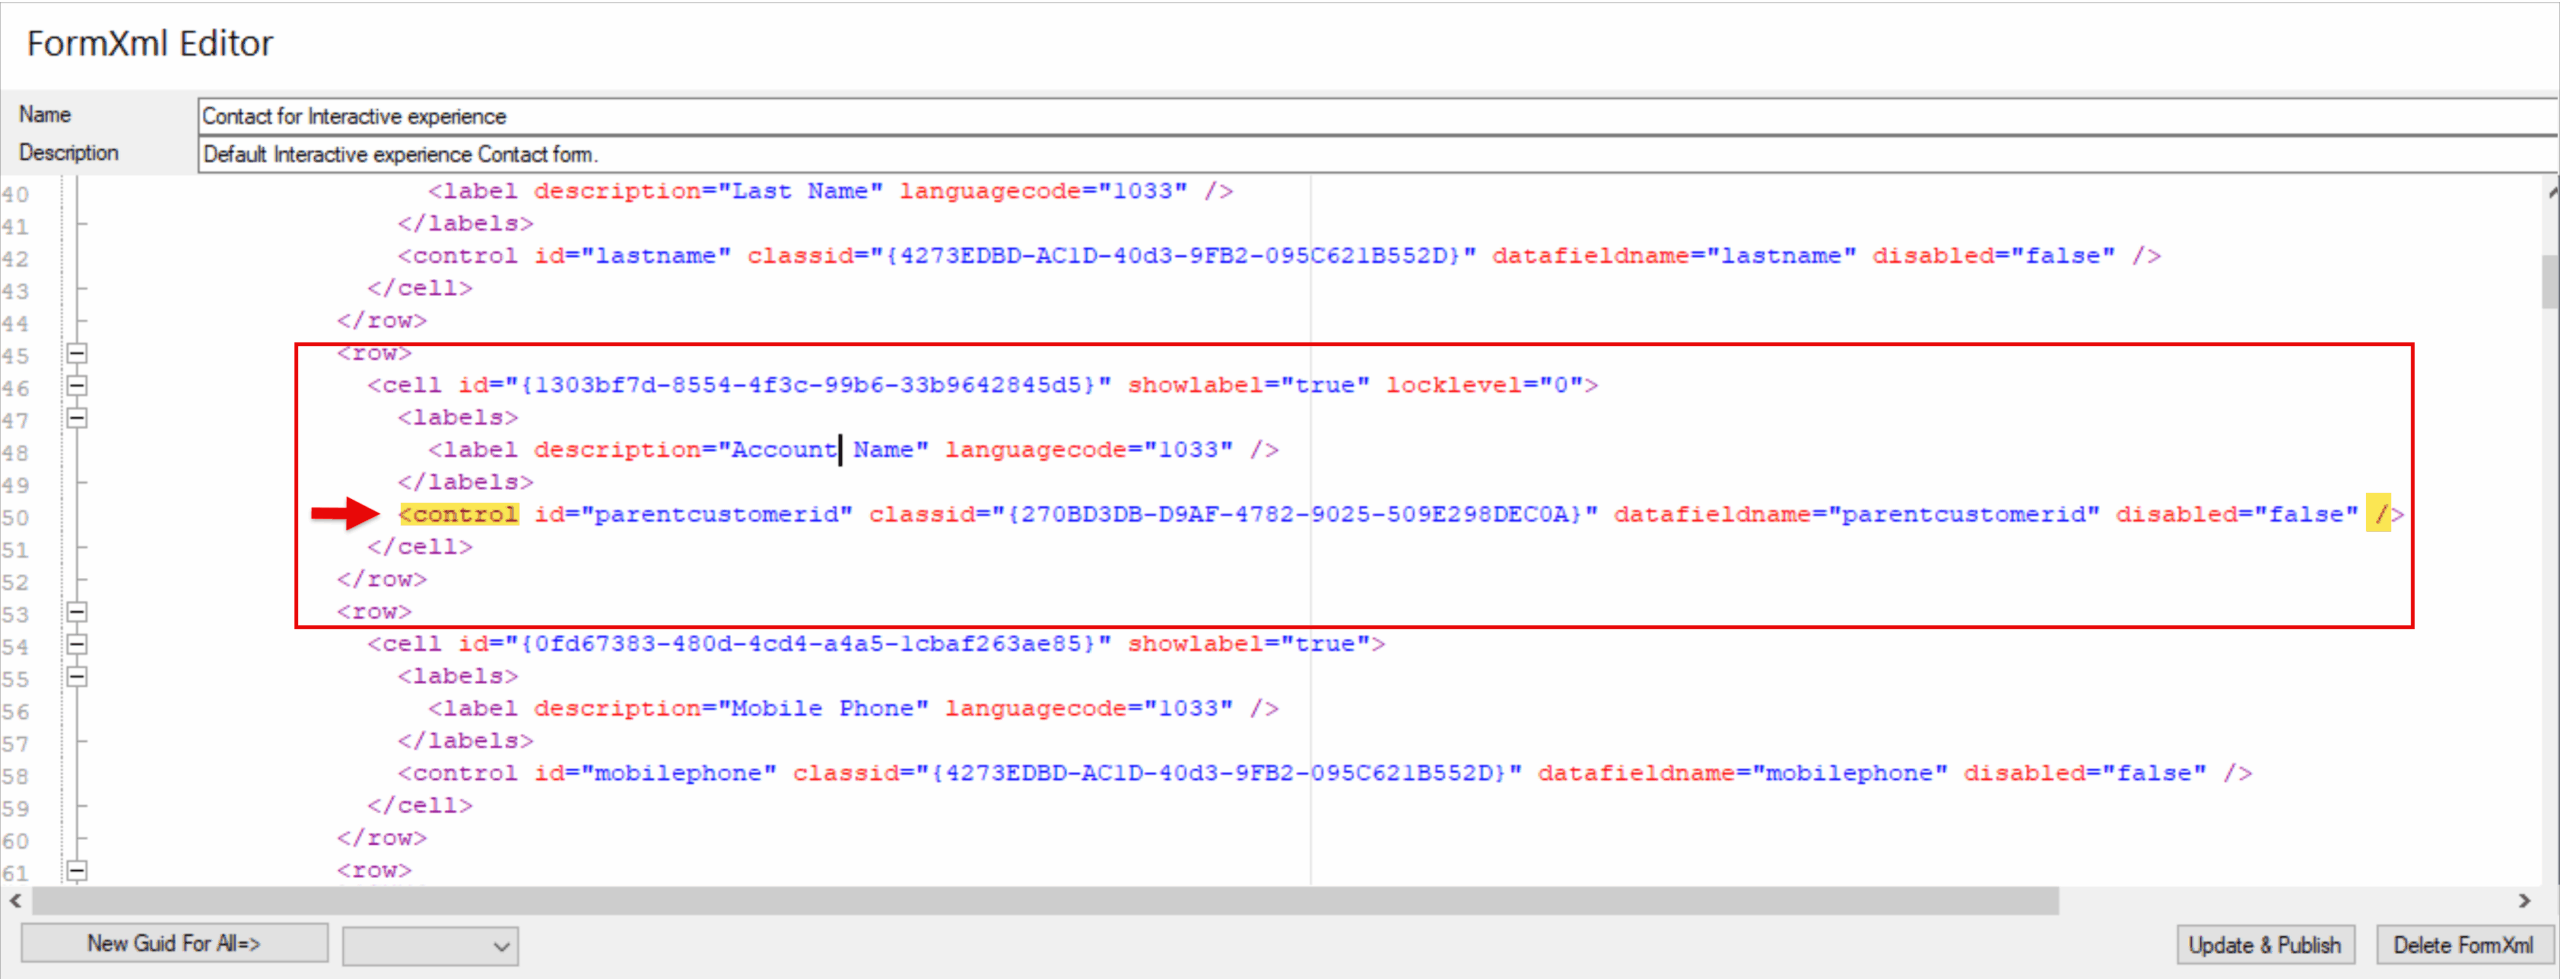
  9. Insert the following line into the parameters section of the lookup field:

<parameters>

<IsInlineNewEnabled>false</IsInlineNewEnabled>

</parameters>

A screenshot of a computer

AI-generated content may be incorrect.

A white paper with red and blue text

AI-generated content may be incorrect.

  1. Update and publish the XML.
  2. Verify the field in the UI—if successful, the ‘New’ button will be hidden for the lookup field (refresh cache if required Ctrl+F5).
    A screenshot of a computer

AI-generated content may be incorrect.

YAY! 😊

Posted in D365 Customer Engagement (CRM), D365 Customer Service, D365 Project Operations, Power Platform | Tagged , , , | Comments Off on How to hide +New option from lookup fields in D365?

How to work with custom help panes and guided tasks?

You can configure a custom in-product help experience in Dynamics 365 that is tailored to your organization. Use custom help panes to provide table, form, and language-specific help and guidance that includes rich text, content links, images, and video links.
Microsoft Dynamics 365 for Customer Engagement provides you with two options when it comes to help features. However, you can enable and use one of the feature at a time. These features are:

  1. Custom help for customizable entities (read more)
  2. Custom help panes


The following section focuses on how you can use Custom Help Pane and Guided Tasks.

Prerequisites

Enable Custom Help Pane

If you are using custom help panes and guided tasks, you would need to enable the feature in each environment, for example Dev, Test, Prod, etc. This has to be done once per environment.
To enable custom help panes for your environment, perform the following tasks:

  • Log into Power Platform admin center
  • Select relevant environment and click Settings
  • Click Product > Features
  • Under Help features, Enable Custom Help Panes
  • Click Save


Note: You can enable one feature at a time. So as a result the Custom help for customizable entities is disabled.

Privileges

There are two out-of-the-box roles available in Dynamics 365:

  1. Help Page Author
    To author help pane, you need global create, read, write, delete, append, and append to privileges on Help Page table. This is available in “Help Page Author” role.
     

  1. Help Page Consumer

To view help panes in an app, users need read privilege on the Help Page table. This is available in “Help Page Consumer” role.

Note: When you author help, please note that each help pane is unique for the following contexts:

  • Application
  • Table
  • Form
  • Language

Tools

In the following example we will edit custom help pane for Case.
Once the prerequisites steps are completed, as a help author, perform the following steps:

  1. Click Help on the navbar. This will open the help pane.
  2. Click on ellipses and click Edit.

  1. Use the following tools to edit the help pane:

    1. Numbered List
    2. Bulleted List
    3. Link
    4. Balloon
    5. Coach Mark
    6. Image
    7. Video

Free-form text

  • Text can be placed anywhere within the help pane.
  • Enter free-form text before, in, or after sections.
  • Text supports bold, italic, underline, and strikeout font formats. Cut, copy, and paste can be used as well as multilevel undo.

Bullets and numbered lists

  • Selecting the bullet or number icon toggles the current line to become bulleted or numbered.
  • If you have selected multiple lines in a list, each line becomes bulleted or numbered.
  • Tabbing and indenting sub numbers align within the list.

Sections

  • A section is a collapsible text box. A section can be either open or collapsed by default.
  • You can put links or free-form text in it.
  • Use a section to group similar items.

Video and static images

  • You can insert videos and static images into your help pane.
  • Videos and images are links to content on the internet. Custom help panes do not store the video and image files in your help pane.
  • When the help pane is opened, custom help panes bring the content in from the link to display it. You can use a link to a Microsoft Stream video if you want to reference corporate private content.

Note: Custom help panes support the following video sources: Microsoft Stream, YouTube, Facebook and Vimeo.

Links

  • Links can be to websites and open in the same window (the default) or open in a separate window.

Note: The ability to link to an existing help page is not yet enabled.

Balloons and coach marks

  • Balloons and coach marks can be used to point to specific UI elements.
  • A balloon can have text in it.

Move help content via solution

  • Each time you create a new help pane, the system creates a Help Page record in Dynamics 365.
    This can be moved to a different instance.
  • You can move help pages by creating a solution and adding the help pages as components to the solution.
  • To add a help page to a solution, open the solution and click ‘Add Existing’ and select ‘Help Pages’ from the drop down.
  • This will open the “Select Solution Components” window, from which you can select the help pages you want to include in your solution.

Video Resource

Posted in D365 Customer Engagement (CRM), D365 Tips & Tricks, Microsoft Dynamics 365 | Tagged , , , , | Comments Off on How to work with custom help panes and guided tasks?

How to work with Global Custom Help URL & Table Help URL?

Microsoft Dynamics 365 for Customer Engagement provides you with two options when it comes to help features. However you can enable and use one of the feature at a time. These features are:

  1. Custom help for customizable entities
  2. Custom help panes (read more)


The following section focuses on how you can use Global Help URL along with Table Help URL for custom help in Dynamics 365.


Default Setting

When an environment is provisioned, global help URL or custom help panes and guided task feature is not enabled, i.e. When you open a form and click on the help icon in nav bar, it takes you to Microsoft Learn documentation.

Enable Help Feature

Perform the following steps:

  • Log into Power Platform admin center
  • Select relevant environment and click Settings
  • Click Product > Features
  • Under Help features, enable custom help for customizable entities


Custom Help for Customizable Entities

If this option is enabled:

  • Enable Custom Help Panes option will be disabled.
  • You would need to provide a Global custom help URL. This will be the default URL when you click on the help icon in nav bar (if entity specific help URL is not provided).

Note: In this example I have used my website to be set as default global URL for demonstration, you can use your organization specific URL.


Result

In the following example, we have provided my website URL i.e., 365proz as global custom help URL.

Now, when we open any table form (say Case form) and click on Help, it will open the global URL that we have set.


Table Level Help URL

With the table help URL, we can configure different URL for different tables, by editing the properties on table level. In the following example we have provided URL specific to one of my blog page that describes Case Creation.

Note: In this example I have used my blog to be set as table level URL for demonstration, you can use your organization specific URL.


Result

Open a Case record and click on the help icon, you will notice that it opens specific blog page, as we specified for Case table.


Note: If you have not setup table specific for other entities, then the global URL will open when you click on help icon.


Video Resource

Posted in D365 Customer Engagement (CRM), Microsoft Dynamics 365 | Tagged , , , , , , | Comments Off on How to work with Global Custom Help URL & Table Help URL?

How to add sample data in Dynamics 365 Customer Engagement?

To install sample data in Dynamics 365, perform the following steps:

Classic Environment

If you are using classic environment:

  1. Go to Advanced Settings
  2. Click Data Management
  3. Click Sample Data
  4. In the pop up window, click Install Sample Data

Note: To remove sample data, follow the same steps and in pop-up window, click Remove Sample Data.

Power Platform

If you are using power platform admin center:

  1. Select your environment
  2. Click Settings
  3. Click Sample Data under Data Management
  4. In the pop up window, click Install Sample Data

Note: To remove sample data, follow the same steps and in pop-up window, click Remove Sample Data.

Import Jobs Created

The following import jobs are created:

Import Name Status Reason Successes Partial Failures Errors Total Processed
Sample Data Subject Completed

6

0

0

6

Sample Data Task Completed

14

0

20

34

Sample Data Goal Completed

4

0

0

4

Sample Data Article Completed

4

0

0

4

Sample Data Incident Resolution Completed

0

9

0

9

Sample Data Product Price Level Completed

0

0

13

13

Sample Data KnowledgeArticle Completed

11

0

0

11

Sample Data Email Completed

0

0

9

9

Sample Data Category Completed

6

0

0

6

Sample Data Account Completed

10

0

0

10

Sample Data Campaign Completed

8

0

0

8

Sample Data Case Completed

33

0

0

33

Sample Data Contact Completed

13

0

0

13

Sample Data Dynamic Property Completed

19

0

33

52

Sample Data Dynamic Property Option Set Item Completed

0

0

28

28

Sample Data Lead Completed

10

0

0

10

Sample Data Opportunity Completed

10

0

0

10

Sample Data Phone Call Completed

10

0

25

35

Sample Data UoMSchedule Completed

1

0

0

1

Sample Data UoM Completed

1

0

0

1

Sample Data Product Completed

19

0

0

19

Sample Data Product Association Completed

29

0

0

29

Sample Data Product Substitute Completed

30

0

0

30

Sample Data Price Level Completed

2

0

0

2

Posted in D365 Customer Engagement (CRM), D365 Tips & Tricks, Microsoft Dynamics 365 | Tagged , , , , , | Comments Off on How to add sample data in Dynamics 365 Customer Engagement?

How to create flow from a template?

Go to your https://portal.office.com and login with your credentials.

Search for Power Automate and open the page.

Make sure you are in the right environment, for example as shown below which is my demo environment.

Click Templates from the navigation.

Search for the desired template, for example here we are looking for “Click a button to email a note”.

Click the template. Provide necessary credentials for the connector and click Create flow.

Check the details of the flow created. Then click Run.

When prompted, provide the parameters and click Run flow.

Check your inbox to see the email.

Posted in Microsoft Dynamics 365, Power Automate, Power Platform | Tagged , , , | Comments Off on How to create flow from a template?

D365 – Plug-in Deploying and Testing

In the previous blog “D365 – Pug-in Writing Code” we saw how we can write the Plug-in code. Now let us see how we can deploy and test the Plug-in.

Note: The .NET Framework used in this case was 4.7.1.

Sign the Assembly

The cloud platform only allows signed assemblies as that makes it more secure.

  • Right-click the project > Properties.
  • Click Signing.

  • Select Sign the assembly.
  • Select <new> in Choose a strong name key file.

  • Specify Key file name.
  • Optionally provide the password or uncheck Protect my key file with a password field.
  • Keep the default Signature Algorithm and click Ok.

Build the Project

  • Right -click the Project and click Build. This will create the assembly file.
  • To locate the assembly file again right-click the Project file and click Open Folder in File Explorer
  • Click bin > Debug
  • The DLL file will be available. We need to Register this DLL file into CRM

Register Plug-in

In the blog “D365 – Create Plugin Template”, we had discussed how we can install the tool “Microsoft.CrmSdk.XrmTooling.PluginRegistrationTool”.

We will now use this tool to Register the assembly we just built.

  • Browse to the tool: …\packages\Microsoft.CrmSdk.XrmTooling.PluginRegistrationTool.9.1.0.20\tools
  • Run the “PluginRegistration.exe” tool.

  • Create a new connection to the CRM environment. Provide your credentials and Login.

  • The Plugin Registration tools will show you a list of registered plug-in, which is taken care by the platform.
  • Click Register New Assembly.

  • Specify the location of the DLL in Step 1 and click Register Selected Plugins.

  • You will notice that the plugin is now registered.

  • Now we would need to register a step. Right-click on the plugin and click Register New Step.
  • Specify the following fields:
    • Message = Create
    • Primary Entity = contact
    • Event Pipeline Stage of Execution = PreOperation

  • Click Register New Step.

Test Result

  • Create a New contact, specify First Name and Last Name and Save.
  • Check the result in Personal Notes which is automatically populated.

Code Used

using System;

using System.Collections.Generic;

using System.Linq;

using System.Text;

using System.Threading.Tasks;

using Microsoft.Xrm.Sdk;

using System.ServiceModel;

namespace Tech_Quantum

{

public class HelloWorld : IPlugin

{

public void Execute(IServiceProvider serviceProvider)

{

// Obtain the tracing service

ITracingService tracingService =

(ITracingService)serviceProvider.GetService(typeof(ITracingService));

// Obtain the execution context from the service provider.

IPluginExecutionContext context = (IPluginExecutionContext)

serviceProvider.GetService(typeof(IPluginExecutionContext));

// The InputParameters collection contains all the data passed in the message request.

if (context.InputParameters.Contains(“Target”) &&

context.InputParameters[“Target”] is Entity)

{

// Obtain the target entity from the input parameters.

Entity entity = (Entity)context.InputParameters[“Target”];

// Obtain the organization service reference which you will need for

// web service calls.

IOrganizationServiceFactory serviceFactory =

(IOrganizationServiceFactory)serviceProvider.GetService(typeof(IOrganizationServiceFactory));

IOrganizationService service = serviceFactory.CreateOrganizationService(context.UserId);

try

{

// Plug-in business logic goes here.

//To read from attribute values

string firstName = entity.Attributes[“firstname”].ToString();

string lasttName = entity.Attributes[“lastname”].ToString();

//To assign data to attribute

entity.Attributes.Add(“description”, “Hello World” + firstName + lasttName);

}

catch (FaultException<OrganizationServiceFault> ex)

{

throw new InvalidPluginExecutionException(“An error occurred in FollowUpPlugin.”, ex);

}

//catch (Exception ex)

//{

// tracingService.Trace(“FollowUpPlugin: {0}”, ex.ToString());

//throw;

//}

}

}

}

}

Posted in D365 Customer Engagement (CRM), D365 Development, Microsoft Dynamics 365 | Tagged , , , , , , , , , , | Comments Off on D365 – Plug-in Deploying and Testing